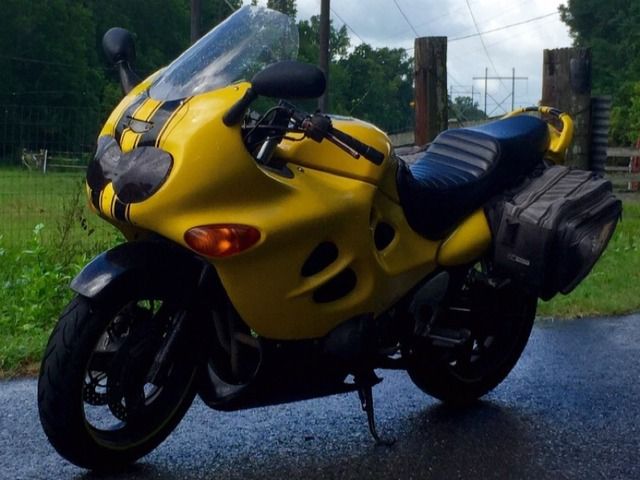
So, I commute on the Kat and have always wanted a compartment or two but always got by with a backpack and a cargo net. A friend has roped me into a trip to Deal's Gap and this motivated me to come up with a little more cargo room. Here's what I came up with, a couple of decent sized toolboxes, some hacked up metal shelving grid, and, for now, a rubber bungee cord. I think I'll be attaching it with 1/4" bolts from under the seat. Its working remarkably well with just the bungee though...
Ad Widget
Collapse
Announcement
Collapse
No announcement yet.
X
-
in all the years i thought to make my own, i never thought of this... +1
Comment
-
Not trying to be a wet blanket, but having used a tool box - albeit in a different format - and made my own luggage rack - a couple of things to watch ...
The plastic is generally not UV stabilised. After 3.5 months in the sun, mine was deteriorating and the flaps for the lid storage cracked and blew off. A better option - as many adventure riders do, is to use the rip off Pelican cases that are very sturdy and uv stabilised.
In your set up, they will cop a lot of wind so ensure they are really well secured using large washers internally to spread the load.
Where ever possible, avoid bungee cords. Every so often they break with the potential of getting stuck in your chain with disastrous consequences. (A local rider died because of this about 10 years ago.)
Ensure your attachment frames can't flex / spring up and down by bracing at the rear foot pegs or joining at the back behind the rear wheel - as most commercial frames do. If they can flex, they will eventually crack - or worse still, crack your frame.
Comment
-
That's a pretty awesome set up you have right there.
Originally posted by TRPUT View Post
Not trying to be a wet blanket, but having used a tool box - albeit in a different format - and made my own luggage rack - a couple of things to watch ...
The plastic is generally not UV stabilised. After 3.5 months in the sun, mine was deteriorating and the flaps for the lid storage cracked and blew off. A better option - as many adventure riders do, is to use the rip off Pelican cases that are very sturdy and uv stabilised.
In your set up, they will cop a lot of wind so ensure they are really well secured using large washers internally to spread the load.
Where ever possible, avoid bungee cords. Every so often they break with the potential of getting stuck in your chain with disastrous consequences. (A local rider died because of this about 10 years ago.)
Ensure your attachment frames can't flex / spring up and down by bracing at the rear foot pegs or joining at the back behind the rear wheel - as most commercial frames do. If they can flex, they will eventually crack - or worse still, crack your frame.Bikes don't leak oil, they mark their territory.
~Author Unknown
Comment
-
Originally posted by fury8793 View PostThat's a pretty awesome set up you have right there.
I reckon if it can get me here, it's a set-up that can get me anywhere.
Originally posted by mmiltonp View PostNah TRPUT, no worries! In fact thanks for the suggestions! I love hearing from experience, that's what these forums for!
If you're reasonably handy, you can adapt your Kat to serve your purposes. Mine was weekend escapes staying in motels ... no problem with panniers and top box. Then it became long distance touring staying in motels ... so I added a small tool box for essential bits (spare oil, tools etc) as seen in my avatar. Then it developed into ultra-long distance touring with camping ... hence, the pipe tubes to secure tent, sleeping bag, mattress, water etc. and a bigger tool box to carry more spares and tools, washing powder, cooker ... and the essential 6-pack cooler.
I like to travel with little in the top box / trunk except for easily accessible and light essentials such as hat, walking shoes, snacks ... This means less weight right at the back (the impact of which is magnified by the lever effect) and room to lock away my helmet and jacket should I head off on a bush walk.
Comment
Comment