Ad Widget

Collapse

Announcement

Collapse
No announcement yet.
X

1989 GSX600F carburetor rebuild project

Collapse
  • Filter
  • Time
  • Show
Clear All
new posts

  • #31
    Originally posted by foxox View Post
    Should I get a Factory Pro kit rather than stock? I was thinking I would move it all back to stock, but I haven't made any purchases yet.

    OEM is lean, especially now days with the newer fuel mixtures. A Stage 1 kit can be tuned to work well for a mostly stock system but not overly lean out the engine and resolve flat spots and vibration like stock is. A FP stage one properly tuned would result in a better performing engine over all.

    Krey
    93 750 Kat


    Modified Swingarm, 5.5 GSXR Rear with 180/55 and 520 Chain, 750 to 600 Tail conversion, more to come. Long Term Project build thread http://katriders.com/vb/showthread.php?t=96736

    "I've done this a thousand times before. What could possibly go wron.... Ooops!"

    Comment


    • #32
      Originally posted by steves View Post
      Get a can of Berryman's chem dip from autozone for like $20 each. Dip each body over night, then rinse out in soapy water. Follow that with a boil on the stove if you are feeling like it.
      I got the Berryman's Chem-Dip stuff on my way home a couple of days ago. $19.99 just like you said! There are warnings all over it saying to keep it off of your skin... hopefully nitrile gloves are enough. You just put the carb bodies right in the paint-can thing it comes in? It looks like it comes with a tray with a handle so that it is easy to get parts out after putting them in.

      As for stove boil... in water or soapy water?

      Originally posted by Kreylyn View Post
      OEM is lean, especially now days with the newer fuel mixtures. A Stage 1 kit can be tuned to work well for a mostly stock system but not overly lean out the engine and resolve flat spots and vibration like stock is. A FP stage one properly tuned would result in a better performing engine over all.
      Since I'm new to this I want to make sure I have this right... the "Standard drop-in carb kit" part "CRB-S01-1.0" on this page? http://www.factorypro.com/prod_pages/prods01.html

      That'll be more expensive than the stock stuff I was thinking of going with, but the project total cost will still be (barely) under the $280 the PO paid to have the carbs /just cleaned/ a couple of years ago, so I don't mind for what is turning into a complete rebuild :P That's about what "rebuilt" carbs go for on eBay, but I know this was done right and I've learned A LOT.

      Comment


      • #33
        You're underestimating the cost of buying a set of rebuilt carbs from e-bay.
        With factory jetting try $375. http://cgi.ebay.com/ebaymotors/carbu...Q5fAccessories
        With Factory Pro jetting try $475. http://cgi.ebay.com/ebaymotors/carbu...Q5fAccessories
        ...and those are for 90-97 carbs. I don't see any listings for 1989 carbs.
        Wherever you go... There you are!

        17 Inch Wheel Conversion
        HID Projector Retrofit

        Comment


        • #34
          Originally posted by Wild-Bill View Post
          You're underestimating the cost of buying a set of rebuilt carbs from e-bay.
          With factory jetting try $375. http://cgi.ebay.com/ebaymotors/carbu...Q5fAccessories
          With Factory Pro jetting try $475. http://cgi.ebay.com/ebaymotors/carbu...Q5fAccessories
          ...and those are for 90-97 carbs. I don't see any listings for 1989 carbs.
          Yeah, good points... I just searched "gsx600 rebuilt carb" and picked the lowest one. Doing all of the bike work myself is paying off!

          Also I forgot to say earlier... CarbKitCapital never responded to my email about the diaphragms, but they responded to an eBay message about buying stuff from them on eBay and on their website and combining shipping. They said to just use the website (I couldn't since they have only 3 of the 89 carb rebuild kits in stock there, even though they say they have at least 4 on eBay). I let them know about the inventory issue and I'm waiting for a response about that now.

          I just put one carb body into the Chem-Dip... I'm not sure how to know if it got into all of the passages or if bubbles are keeping it from getting in. I tried agitating it a bit and a couple of bubbles came up, but I couldn't get any more, so maybe it's all good.

          Comment


          • #35
            Yah, I'm not impressed with CarbKitCapitol's website, either. I can tell you that they ship fast, though and the parts were right. Wish they posted a phone number but I don't see one.
            Wherever you go... There you are!

            17 Inch Wheel Conversion
            HID Projector Retrofit

            Comment


            • #36
              The Berryman's says to rinse it in soapy water. I've never personally boiled a carb out, but I've heard that's another method of making sure all the passages are cleaned out.

              I usually dip each body for at least an hour, then rinse well in soapy water, spray with carb cleaner, and then use compressed air to displace any fluid that might still be in the small passages.
              -Steve


              sigpic
              Welcome to KatRiders.com! Click here to register
              Don't forget to check the Wiki! http://katriders.com/wiki

              Comment


              • #37
                Originally posted by steves View Post
                Just because #4 had more dirt in it, doesn't really mean anything specifically.

                Did you happen to snap a pic of the rack fully assembled before you started?

                This is interesting as they look like old GS carbs... and they are different than '88 carbs.
                When I read this I was like wtf is he wrong???
                I ask this cause as a mechanic I deal with a ton of different stuff but dont know specifics to the years. I have an 88 katana 600 and the carbs in that pick are identical to mine. At least looking. I have an issue with mine as my diaphrams are shot and cost way to much to replace when I can get brand new carb set for just over 1000$.

                Just thought I would add my 2cp on the carb years.

                Comment


                • #38
                  Originally posted by creepinghunter View Post
                  When I read this I was like wtf is he wrong???
                  I ask this cause as a mechanic I deal with a ton of different stuff but dont know specifics to the years. I have an 88 katana 600 and the carbs in that pick are identical to mine. At least looking. I have an issue with mine as my diaphrams are shot and cost way to much to replace when I can get brand new carb set for just over 1000$.

                  Just thought I would add my 2cp on the carb years.
                  I think the diaphragms only wind up costing too much if you replace the whole slide assemblies. I'm going to try replacing just the diaphragms themselves at $20/each

                  EDIT FROM THE FUTURE: DON'T DO ANY OF THIS NONSENSE BELOW... I tried it and it didn't work. Just pull out the old diaphragms; the plastic parts don't go anywhere.

                  , but I'll have to undo these plastic pieces in there at the risk of breaking the little tabs. I'll also have to be careful to line up the little rubber tab on the outside ring of the diaphragm in the right place so it lines up with the notch in the carb bodies. I think worst case will be that I break the plastic tab things and have to epoxy/bolt those parts together and/or misalign the rubber tabs on the diaphragms and wind up just cutting them off.
                  Last edited by foxox; 03-03-2011, 12:07 AM. Reason: added caution for readers

                  Comment


                  • #39
                    I just took the last carb body out of the Chem-Dip and cleaned it off. I was nearly done cleaning and drying it off afterward when an air blast into one of the things the throttle springs hold onto made a decent-sized dead spider pop out! It was curled up in there. Scared the !@#$ out of me!!

                    The chem-dip did a pretty good job on everything; the carb bodies look shiny new. It seems to break through corrosion; the brass parts are much shiner than before and the steel parts have no more rust. Or so I thought. The other three carb bodies, which have been sitting for a couple of days on the workbench, have some fresh rust spots on their steel pieces... I think the chem-dib broke through a protective patina of light corrosion. I put a dab of WD40 on all of the steel parts to try to prevent that from getting any worse.

                    Anyway, here's a dumb newbie question for someone:
                    What's the deal with these Factory Pro jet kits... what actually comes in the package in terms of jets? Just one size of each one needed, and a size picked by FactoryPro at that? Posts like this make it seem like the kit comes with some selection of jet sizes to choose from?

                    The website doesn't say much about what actually comes in the kit:
                    factory, bandit, gsf, 1200, carb, carburetor, carburator, tuning, stage 3, config 30, stage 1, mikuni, BMC, air filter, auto, automotive, motorcycle, ega, exhaust gas analyzer, factory, Aprilia, bandit, Honda, BMW, Buell, cbr, cbr600, ec997, eddy current, gsx, gsxr, ignition advance, Indian, jet, Kaw, Kawasaki, Yamaha, Mikuni, Keihin, Harley Davidson, r6, salvisberg, shift kit, tuning, billet, engine cover, dyno, dynojet, power commander, 100, 150, 200, factory, emulsion tube, needle jet, transmission detent, allen screw, racing, sounds, frame bumper,

                    Factory Pro 800 869-0497 Tuning Shift Kit Aprilia Ducati Honda Kawasaki KTM Suzuki Yamaha


                    Also, still no word from CarbKitCapital regarding their website/inventory problems... not the fastest with emails... I'm about ready to just order the rebuild kits and diaphragms from other sites.

                    Comment


                    • #40
                      Jet kits usually come with 2, or maybe 3 sets of jets in different sizes along with instructions on which jets to install per your modifications.
                      -Steve


                      sigpic
                      Welcome to KatRiders.com! Click here to register
                      Don't forget to check the Wiki! http://katriders.com/wiki

                      Comment


                      • #41
                        Updates!!!

                        Updates! (ffffff Just typed up this whole post and my browser crashed, so here goes try two)

                        So I finished rebuilding my carbs a couple of weeks ago, but am just now getting a chance to upload photos and such.

                        I got all the parts I needed... new diaphragms, gaskets, orings, float needle seats, float needles, FP jet kit, new fuel tubing.


                        I Berryman's Chem-Dip'd all of the parts that seemed appropriate... the bodies and the bowls.


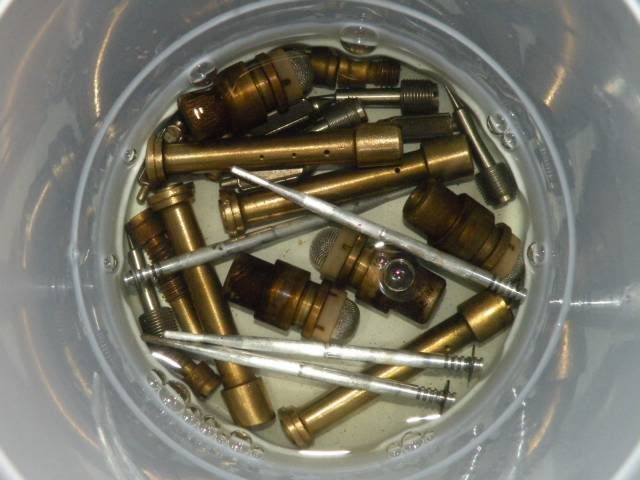
                        All of the small parts sat in SeaFoam for a couple of weeks while the project was going on; the brass parts didn't clean up well, but the steel and aluminum was sparkling by the time I put things together.


                        So clean 8D


                        The biggest issue I came across was that the diaphragms I got do NOT match the ones from my carbs, which were probably the original 89-style diaphragms. The ones I got are the 90+ type, and I was concerned about it so I contacted several companies which were selling them to confirm that they would work in my carbs; they all said yes. Well, they do work, but they aren't identical and as you'll see below, they might cause me some trouble (I will actually attempt to run the bike this weekend, so we'll see).

                        First off, the "inner diameter" of the diaphragm, where it would attach to the slide, is greater on these diaphragms than the ones I removed, AND they are thicker than the removed ones at that point.

                        Here's how the old ones come out. DON'T DISCONNECT THE PLASTIC PIECES FROM THE SLIDES OR YOU WILL HAVE TO FIX IT WITH A SOLDERING IRON LATER AND IT WON'T HELP YOU ANY, ESPECIALLY NOT WITH NEW DIAPHRAGMS. Anyway, here's how to get the old ones off without breaking the plastic... just pull them out (they stretch)


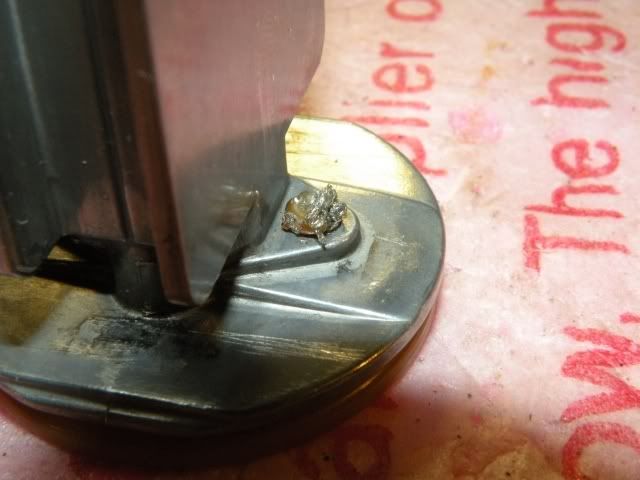
                        And here's what it looks like if you DO break the plastic thing off of the slide (the thing in my hand is the part of the slide typically hidden under the plastic part).


                        And here's how you will have to melt the plastic part back together (soldering iron does the trick) if you do break it off (but just don't do that; it doesn't help anything):


                        Ok, so the old ones are out... but how to put the new ones in?
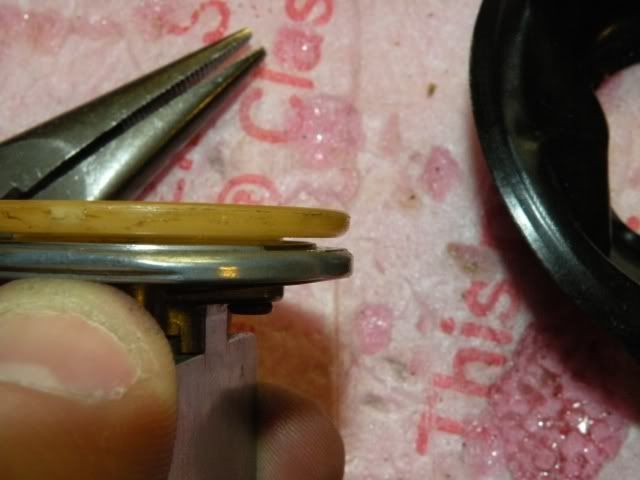
                        They will NOT fit in this gap like the old ones, since they are thicker:


                        The inner diameter of the old diaphragms:


                        Compare to this for the new ones:


                        So, since the diameter is greater, it isn't excessive to stretch them to fit AROUND the plastic piece like this. It almost seems they were /designed/ to do this (anyone know for sure?).


                        So they are attached, and must have a pretty decent vacuum seal, but there is still a problem.
                        The slides sit too high, due to the form of the diaphragm:


                        With the springs and cap on, it isn't as bad (the springs push it down, but not all of the way):


                        How it should be (no diaphragm attached, so gravity could press it down all the way). It's hard to tell from the photo, but it's about 1mm lower than the pic above:


                        I don't know what to do about the last thing. Two of my carbs seem fine actually... I guess those springs are slightly stronger than the other two. The springs are still available from parts sites, so if I cannot tune the bike like this, I'll drop the $20 to replace the springs too (though I wonder if it would even solve the problem). Anyone know?

                        Finally, one funny note... when the carbs were all (or so I thought) back together, I was left with 4 little springs on my table. WHAT. I was really confused for a bit, and double -- triple -- quadruple checked the microfiche schematics to make sure I wasn't missing something obvious. Then I had a hunch that it could be part of the AF screw stuff, since those are not on the microfiche anyway. I checked the pics I took during disassembly and sure enough I had a pic of the spring on the AF screw. The order is: A/F screw rubber oring, A/F screw metal washer, A/F screw spring, then the A/F screw itself... when you tighten it, it pushes the spring, which pushes the washer, which pushes the oring, making a seal at the bottom.

                        So this weekend I'll probably have time to test it all...

                        Here is the complete set of photos on my photobucket account. I didn't include them all in this post: http://s95.photobucket.com/albums/l1...arb%20Rebuild/
                        Last edited by foxox; 03-02-2011, 11:58 PM. Reason: huh... one of the images doesn't show up

                        Comment


                        • #42
                          nice job

                          hey dude, why are you posting my carbs
                          Originally posted by Wild-Bill View Post
                          You're underestimating the cost of buying a set of rebuilt carbs from e-bay.
                          With factory jetting try $375. http://cgi.ebay.com/ebaymotors/carbu...Q5fAccessories
                          With Factory Pro jetting try $475. http://cgi.ebay.com/ebaymotors/carbu...Q5fAccessories
                          ...and those are for 90-97 carbs. I don't see any listings for 1989 carbs.
                          BTW both of those sets are gone A Katriders member actually bought the 90-97 ones with the new FP kit
                          Last edited by arsenic; 03-03-2011, 12:07 AM. Reason: Automerged Doublepost

                          Comment


                          • #43
                            Originally posted by arsenic View Post
                            nice job
                            Lol sweet... a "nice job " from Mr. Carb Rebuild himself!

                            What do you think of how the slides sit about 1mm high due to the new diaphragms? The 90+ type have this pressed shape in them, but the 89 ones were totally loose and floppy and so didn't have this problem. I wonder if it'll "wear in" and not be a problem soon, or if I'll have to buy new springs.

                            And I'm curious whether the way I attached the diaphragms to the slides by stretching them around is Kosher or not, and if not, if there's a better way?

                            I can't wait to try to get the bike to run in a couple of days... it's getting warmer and I have a huge itch to ride... it's driving me bonkers ansotehusanoethu

                            Comment


                            • #44
                              To tell you the truth, I don't really touch 88-89 600 or 88-93 1100 carbs. Simply because of the way the floats are installed. With that float pin between the two posts. It's far too easy to break one of the posts. Plus it's really easy to swap 90-97 carbs on an 88-89 600. So, I don't have much experience with your carbs. Sorry, I'm not in the mood to think a lot right now. I'll read more tomorrow.

                              Comment


                              • #45
                                Originally posted by arsenic View Post
                                ...hey dude, why are you posting my carbs
                                ...
                                You have a problem with free advertising???
                                Wherever you go... There you are!

                                17 Inch Wheel Conversion
                                HID Projector Retrofit

                                Comment

                                Working...
                                X