
 Tweet
Tweet
This install was on a 2005 600 Katana.
Product: SRP Illumiglo Guages (reverse) -- (aka:white guages)
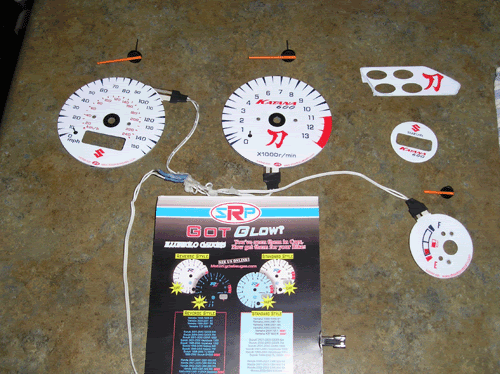
These are the guages I bought from "KatanaSoldier". I purchase the whole assembly already done. I didn't want to use the new speedo, as the miles on it were a lot higher than my bike. I already disassembled the new guages KS sent me, Didnt think those steps needed to be here.. anyway..
Here are the steps I took to install everything into my original setup..
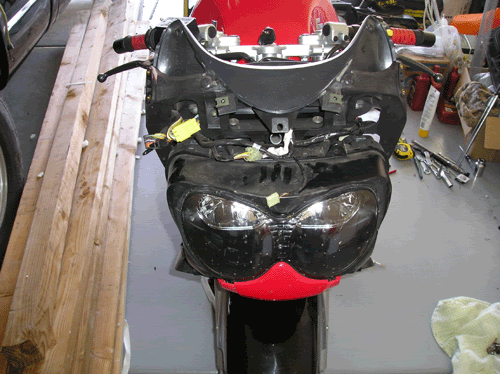
Start off by disconnecting your battery.. Then take off your Left Fairing, Right Fairing and your Center cowl. After that take off your windscreen. The front of your bike should now look like this..
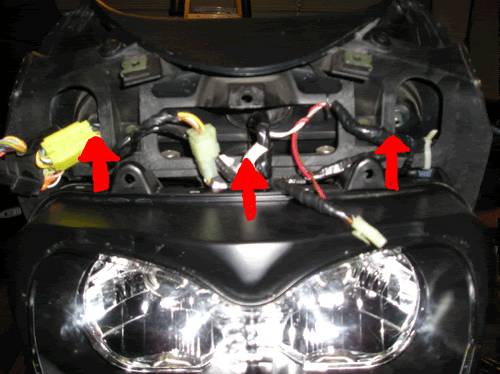
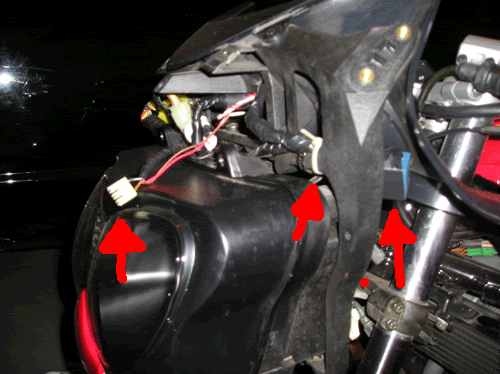
Now you are ready to take out the guages. In the image below are red arrows pointing to the three 10mm nuts you need to remove. The two side nuts are simple enough to get to. The center nut is in there a bit, work at it, you'll be able to reach it.
Now that we have those three nuts off, lets go ahead and disconnect the guages from the wiring harnest. Lift the guages up and out a little bit. You should see the plug, surrounded by a rubber boot. Pull back this boot and unplug the guages.

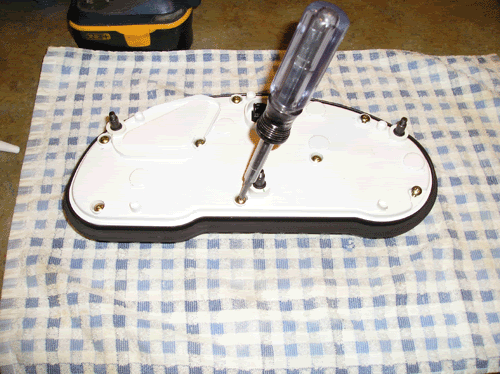
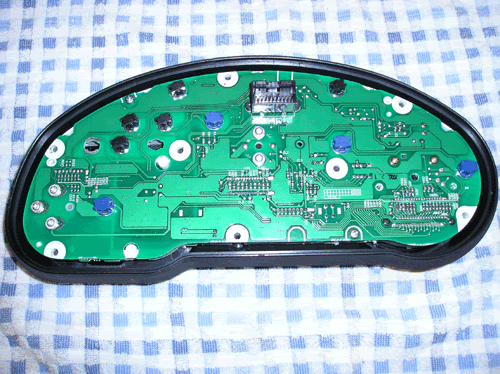
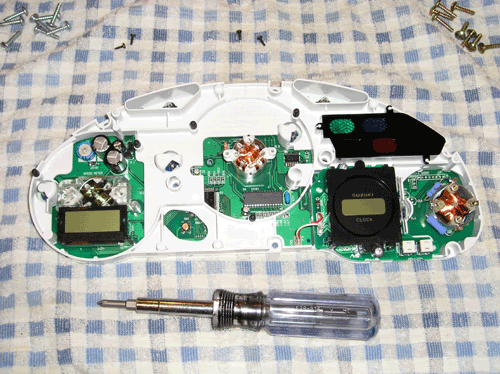
That was simple enough, huh..? Ok, now time to disassemble the guage housing. I did this on my kitchen counter, flat, clean, and no garage dust/dirt to get into the guages once opened. Start off by taking off the 8 phillips screws on the back. Like so..
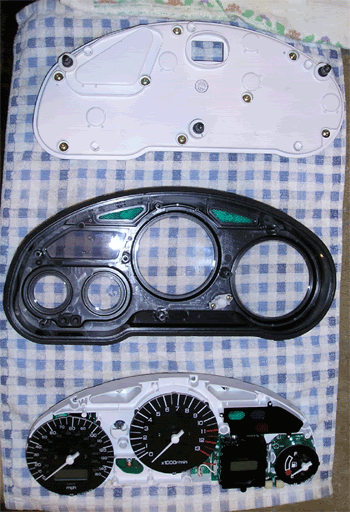
You will now be able to take out the guages from their housing. Go ahead and pull up on the guages and set them on a clean area, free of static electricity. This is what it should look like once you have taken the guages out..
Now I had to take off the needles on the guages. I used a flathead screwdriver, and pride up carefully. These are in there pretty tight, it did take some doing to get them off. Keep at it, they will come..
Needles are off !!
Once I got off the needles, I took off the faces of the guages.

I had to take these off, you more than likely will not have to. The new faces(Illumiglo's) have sticky tape on them, and the ones I bought were already stuck to the back of another set. So I basicly just swapped the old w/ the new.. Anyway. Your new guage covers will just stick right on your guage faces, so no need to take them off.
Incase your wondering whats behind them faces, here it is.
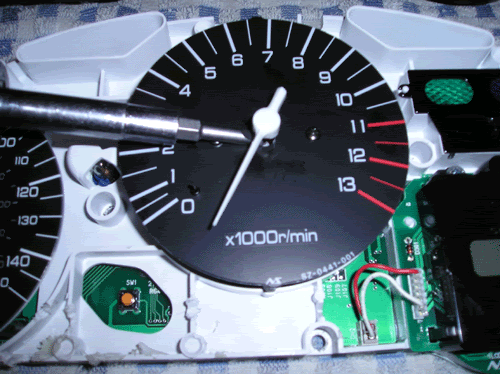
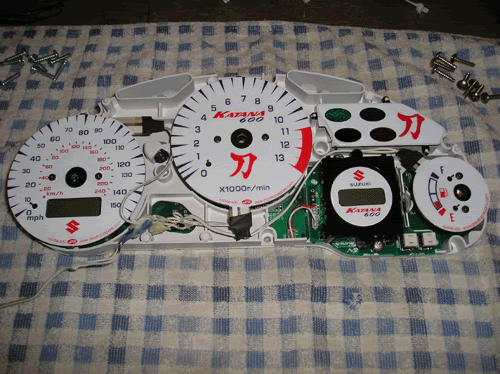
Now the next step (for me) is to put on the new faces. Simple enough. Just align up the holes and put in the small screws. Try not to over tighten these. Now I installed the new needles that came w/ my guage assembly. these are not my stock ones. they have been painted fluoresant orange. It's very important to make sure you put your needles back in the same way. You take them off at 0mph place the needle back on at 0mph.
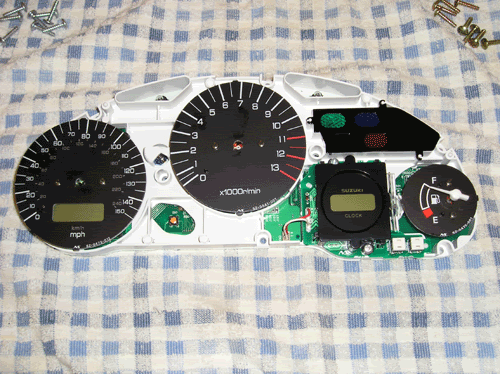
Same w/ your tach, and gas. Once you have done all of this, you should have something similar..
Ok, thats all done.. I noticed on the instrument case that KS sent me, there were some grooves cut into the plastic, so the wires do not get pinched. Good idea. So I follow suit and did the samething. Unfortunitly I didnt take a pic. of how to do this. But I can explain.. The simplest way to do this is to take a regular soldering iron. Map out where you want these wires to go. Then mark the spots on the plastic. Once you have done this the iron should be hot enough to melt down the plastic, making a groove for the wire to lay in. Here is what part of mine looked like..
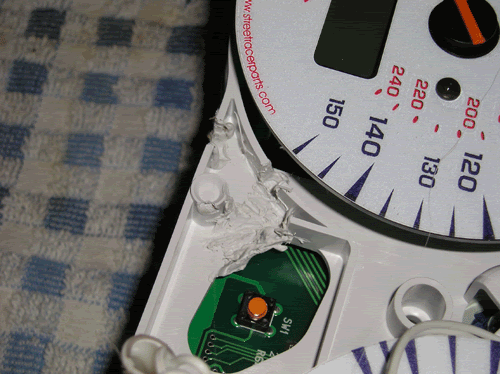
I also made a small slot down the side of the plastic, so the wires can poke through the side w/out crimping. Here is a shot of that.
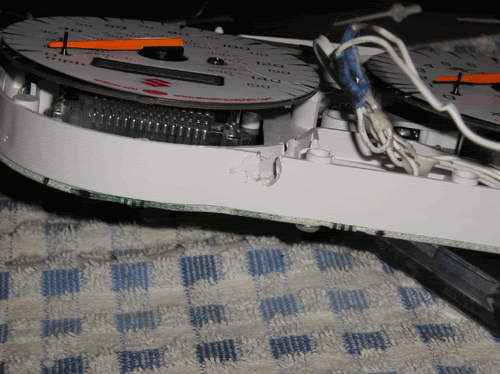
Once everything cooled. I placed the wires into the slots I just made. I then took some silicone and put a little dab over the wires where they fit into the slots, so it would hold them in place.
After I did all this I took a break, to allow the silicone to setup a bit. Good time to go clean the underside of your bike, since you already have the fairings off, ha.. Ok. back into the house to reassemble everything.
Now that things are dry enough to put back together. I just do everything in reverse order. Put the guages back into thier housing, like so.
Now place the back panel back on and screw in the 8 screws..

Flip her over and you should have something that looks similar to this.
Now, place the instument panel back into the bike. and feed the wire through the large hole where the plug is. Go ahead and plug it in and set the boot back in its place.
Now comes the wiring part.. Now plug in the Illumiglo guage face (the wires coming from the faces) into the power inverter. I think I forgot to take a pic. of this item. No worries, you'll know what I mean. Its the square thing with a connector for the guages and two wires coming out.
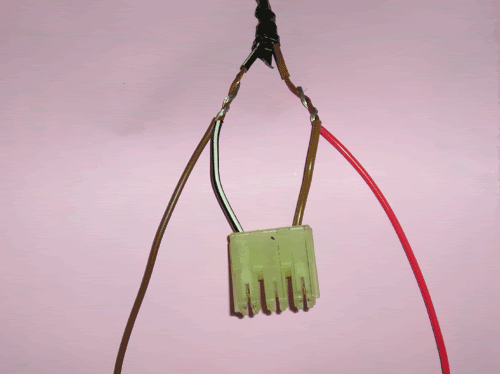
You need to splice the pos.(red) wire into a hot wire, and the brown wire into a ground wire.. The instructions say to use the headlamp but I used the front lamp light, the one above the headlights. Was much more simpler to do.
What I did was splice into this lamp plug. I cut back the wires.

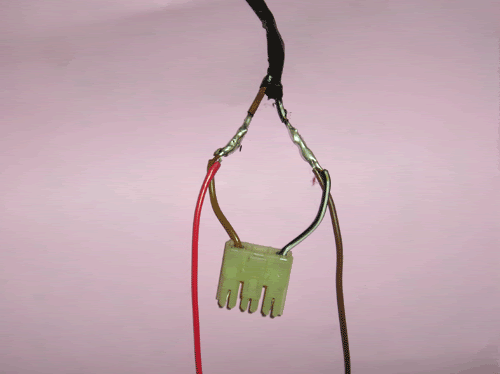
I then wrapped the power inverter wires around the splice.
Pink paper I know, all I had around, made for a better back drop.. Anyway. Remember that soldering iron you used. Get it. Now solder these wires together. You don't have to solder them, if you dont want to. I did cause I like to do things the hard way. laughs.. Ok here it is.
Now wrap it up good w/ black elec. tape. Like this.

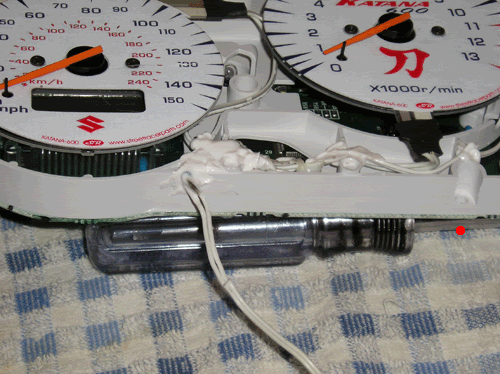
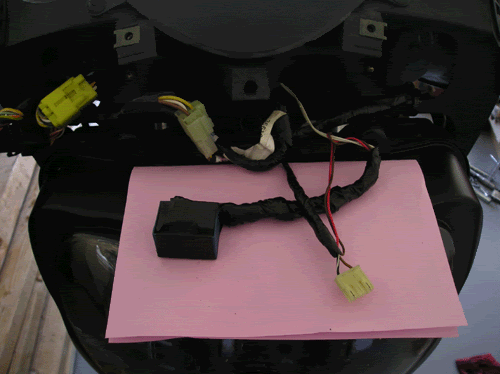
Remember the power inverter. Well here it is.. the inverter comes w/ about 2' of wires. So I bundled them together and taped them up real well..
Once I had everything taped up, I zip-tied them to the bike. The image below shows the spots where I tied them, and tucked the inverter. I made sure that the inverter iwas secured real well, not in a spot where bumps in the road would move it and make a noise while riding, and or come loose..
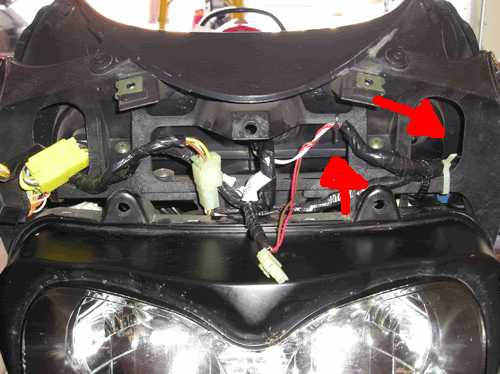
The arrow to the right is the inverter, the middle is the zip-tie, and the left one is the light plug. Mind you I allowed enough slack so I can plug the lamp back in w/ out having to stretch it or pull out any wires etc..
Now all that's left to do is bolt her back down. This is a pain, as that middle nut was hard for me to get back on. With some patience I got it done. Now we can reconnect the battery and test her out..
I couldnt get a decent image of the guages at night. I put that pink paper over my flash, thats why it looks pink.. New camera, still learning it, didnt have time to read the instructions, as I wanted to do this mod first.. This is the best I could do.
Day look..
Night look..
Hope this helps someone. It's not a hard job to do, kinda fun. Sorry if I missed something or a step, but I think I covered it ok. If you have any Q's just PM me, I'll be more than happy to help ya out. Please don't mind the typo's and or spelling.. It's late.. I think this took me longer to do than the mod. Laughs..
Wanted to end by thanking KatanaSoldier for selling me my new guages, and shipping wicked fast..!! Thanks bro..
-=Peace
Product: SRP Illumiglo Guages (reverse) -- (aka:white guages)
These are the guages I bought from "KatanaSoldier". I purchase the whole assembly already done. I didn't want to use the new speedo, as the miles on it were a lot higher than my bike. I already disassembled the new guages KS sent me, Didnt think those steps needed to be here.. anyway..
Here are the steps I took to install everything into my original setup..
Start off by disconnecting your battery.. Then take off your Left Fairing, Right Fairing and your Center cowl. After that take off your windscreen. The front of your bike should now look like this..
Now you are ready to take out the guages. In the image below are red arrows pointing to the three 10mm nuts you need to remove. The two side nuts are simple enough to get to. The center nut is in there a bit, work at it, you'll be able to reach it.
Now that we have those three nuts off, lets go ahead and disconnect the guages from the wiring harnest. Lift the guages up and out a little bit. You should see the plug, surrounded by a rubber boot. Pull back this boot and unplug the guages.
That was simple enough, huh..? Ok, now time to disassemble the guage housing. I did this on my kitchen counter, flat, clean, and no garage dust/dirt to get into the guages once opened. Start off by taking off the 8 phillips screws on the back. Like so..
You will now be able to take out the guages from their housing. Go ahead and pull up on the guages and set them on a clean area, free of static electricity. This is what it should look like once you have taken the guages out..
Now I had to take off the needles on the guages. I used a flathead screwdriver, and pride up carefully. These are in there pretty tight, it did take some doing to get them off. Keep at it, they will come..
Needles are off !!
Once I got off the needles, I took off the faces of the guages.
I had to take these off, you more than likely will not have to. The new faces(Illumiglo's) have sticky tape on them, and the ones I bought were already stuck to the back of another set. So I basicly just swapped the old w/ the new.. Anyway. Your new guage covers will just stick right on your guage faces, so no need to take them off.
Incase your wondering whats behind them faces, here it is.
Now the next step (for me) is to put on the new faces. Simple enough. Just align up the holes and put in the small screws. Try not to over tighten these. Now I installed the new needles that came w/ my guage assembly. these are not my stock ones. they have been painted fluoresant orange. It's very important to make sure you put your needles back in the same way. You take them off at 0mph place the needle back on at 0mph.
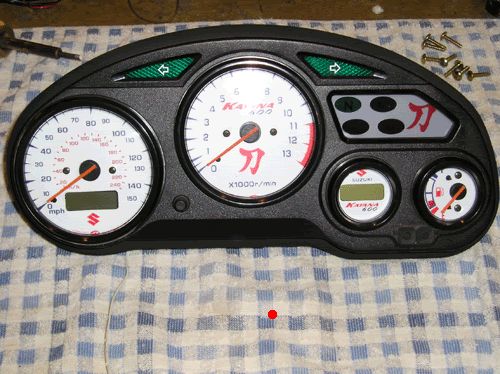
Same w/ your tach, and gas. Once you have done all of this, you should have something similar..
Ok, thats all done.. I noticed on the instrument case that KS sent me, there were some grooves cut into the plastic, so the wires do not get pinched. Good idea. So I follow suit and did the samething. Unfortunitly I didnt take a pic. of how to do this. But I can explain.. The simplest way to do this is to take a regular soldering iron. Map out where you want these wires to go. Then mark the spots on the plastic. Once you have done this the iron should be hot enough to melt down the plastic, making a groove for the wire to lay in. Here is what part of mine looked like..
I also made a small slot down the side of the plastic, so the wires can poke through the side w/out crimping. Here is a shot of that.
Once everything cooled. I placed the wires into the slots I just made. I then took some silicone and put a little dab over the wires where they fit into the slots, so it would hold them in place.
After I did all this I took a break, to allow the silicone to setup a bit. Good time to go clean the underside of your bike, since you already have the fairings off, ha.. Ok. back into the house to reassemble everything.
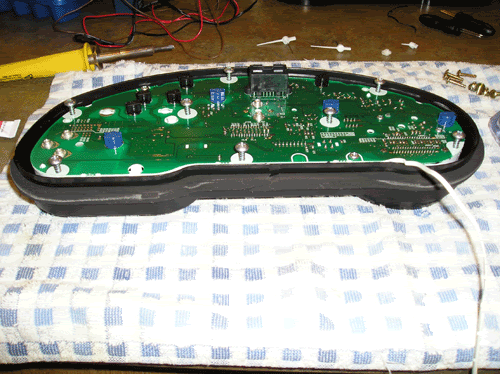
Now that things are dry enough to put back together. I just do everything in reverse order. Put the guages back into thier housing, like so.
Now place the back panel back on and screw in the 8 screws..
Flip her over and you should have something that looks similar to this.
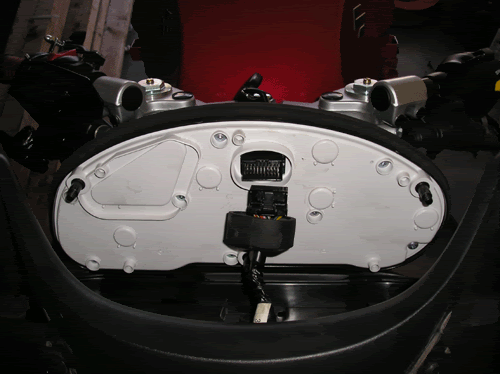
Now, place the instument panel back into the bike. and feed the wire through the large hole where the plug is. Go ahead and plug it in and set the boot back in its place.
Now comes the wiring part.. Now plug in the Illumiglo guage face (the wires coming from the faces) into the power inverter. I think I forgot to take a pic. of this item. No worries, you'll know what I mean. Its the square thing with a connector for the guages and two wires coming out.
You need to splice the pos.(red) wire into a hot wire, and the brown wire into a ground wire.. The instructions say to use the headlamp but I used the front lamp light, the one above the headlights. Was much more simpler to do.
What I did was splice into this lamp plug. I cut back the wires.
I then wrapped the power inverter wires around the splice.
Pink paper I know, all I had around, made for a better back drop.. Anyway. Remember that soldering iron you used. Get it. Now solder these wires together. You don't have to solder them, if you dont want to. I did cause I like to do things the hard way. laughs.. Ok here it is.
Now wrap it up good w/ black elec. tape. Like this.
Remember the power inverter. Well here it is.. the inverter comes w/ about 2' of wires. So I bundled them together and taped them up real well..
Once I had everything taped up, I zip-tied them to the bike. The image below shows the spots where I tied them, and tucked the inverter. I made sure that the inverter iwas secured real well, not in a spot where bumps in the road would move it and make a noise while riding, and or come loose..
The arrow to the right is the inverter, the middle is the zip-tie, and the left one is the light plug. Mind you I allowed enough slack so I can plug the lamp back in w/ out having to stretch it or pull out any wires etc..
Now all that's left to do is bolt her back down. This is a pain, as that middle nut was hard for me to get back on. With some patience I got it done. Now we can reconnect the battery and test her out..
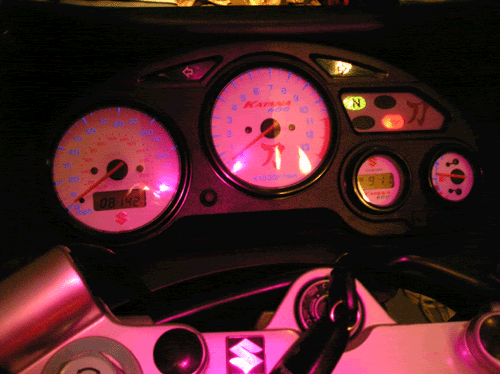
I couldnt get a decent image of the guages at night. I put that pink paper over my flash, thats why it looks pink.. New camera, still learning it, didnt have time to read the instructions, as I wanted to do this mod first.. This is the best I could do.
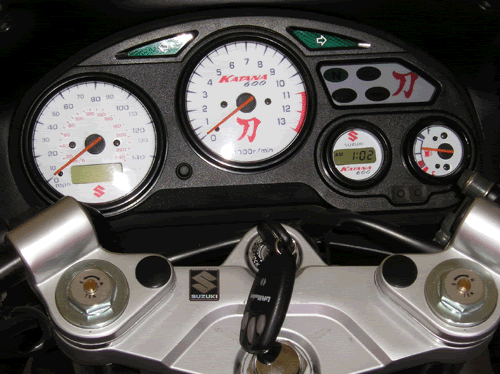
Day look..
Night look..
Hope this helps someone. It's not a hard job to do, kinda fun. Sorry if I missed something or a step, but I think I covered it ok. If you have any Q's just PM me, I'll be more than happy to help ya out. Please don't mind the typo's and or spelling.. It's late.. I think this took me longer to do than the mod. Laughs..
Wanted to end by thanking KatanaSoldier for selling me my new guages, and shipping wicked fast..!! Thanks bro..
-=Peace


 RIP - CyberPoet 20/09/2009
Comment