Ad Widget

Collapse

Announcement

Collapse
No announcement yet.
X

New owner of a 1989 Kat 750....with some exhaust leaks

Collapse
  • Filter
  • Time
  • Show
Clear All
new posts

  • New owner of a 1989 Kat 750....with some exhaust leaks


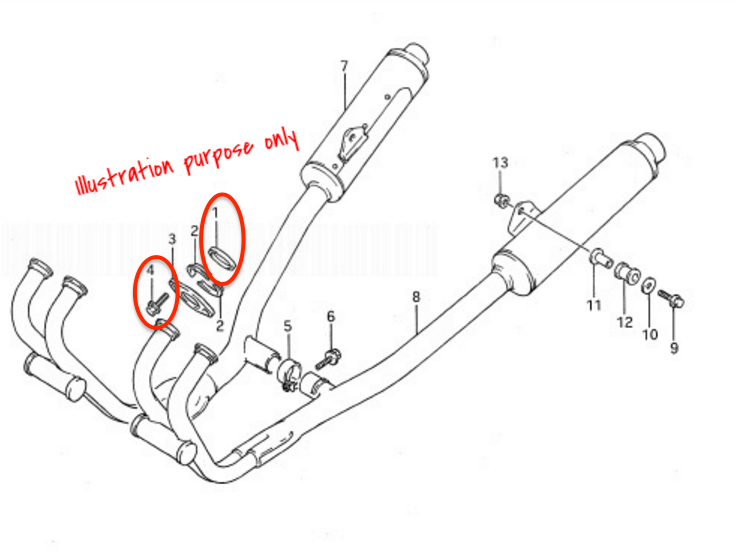
    Hi, I am the new owner of a 1989 Katana 750 and it has some exhaust leaks. When I got it, it had an exhaust leak on one cylinder because the header pipe was broken off, so last night a friend and myself took the exhaust off and welded it up, and then put it back together with new gaskets. It was all fine last night, but when I started it this morning it now is leaking exhaust from all four cylinders. The only thing that I can think of is that we installed the little flanges (part number 2 in the image above) backwards so that they are not actually pressing the header against the gasket. Currently the part that flares out on the flange is against the header (with the rest of the flange sitting inside the clamp plate [part #3]), but I am wondering if it is supposed to be the other way around with the flared out part against the clamp plate and the rest of the flange pressing against the header. This seems to make the most sense to me, although I have looked in the service manual available for download (thanks btw!) and it says nothing about these flanges. I only got the idea by looking at the above image in frustration after trying to fix the leak this morning. Any input would be appreciated.

  • #2
    They are definitely directional, but I can't remember for the life of me which was is right.
    Did you use a torque wrench to tighten everything back up?
    1998 Katana 750
    1992 Katana 1100
    2006 Ninja 250

    2006 Katana 600 RIP - 130k miles

    Comment


    • #3
      No, I did not use a torque wrench to button it up but I did tighten them until everything was visibly seated (ie the clamp up against the block), and the clamps would not go in any further. I don't think I over torqued them, but I suppose it is possible. I guess the only other explanation is I really needed to torque them in order to compress the gasket, but I really don't think the clamps could go any further against the block. It is almost as if I was sent the wrong gaskets and they were too narrow which left too much space that the header pipe couldn't fill before the clamp made contact with the block. If that makes sense.
      Last edited by Dhawk12; 08-01-2017, 11:36 PM.

      Comment


      • #4
        Sure as hell been there. So, I bought a couple different ones. Then I remembered, I have a yoshi header.....tada!!! Ordered yoshi gaskets...felt stupid for about a second..
        "I'm sorry, I didn't mean to upset you when I called you stupid. I thought you already knew..."
        spammer police
        USAF veteran
        If your a veteran, join the KR veterans group

        Comment


        • #5
          I made this crude photo to hopefully illustrate what I am talking about:


          Also, I have a stock header I believe, at least it is identical to the parts diagram above which is an image from a Suzuki parts catalogue, so I don't think it is a case of the wrong header, unless the people I ordered the gaskets from sent the wrong ones. However, after contacting them, they are sure that these are the ones for the bike, so here I am lol.
          Last edited by Dhawk12; 08-02-2017, 12:45 AM. Reason: Change picture

          Comment


          • #6
            is it leaking from the welded pipe? If the headers were bent that would cause leak issues as the seats will not sit flat. Another issue I had on another build, two slightly bent header tubes.
            "I'm sorry, I didn't mean to upset you when I called you stupid. I thought you already knew..."
            spammer police
            USAF veteran
            If your a veteran, join the KR veterans group

            Comment


            • #7
              It was leaking from all the pipes, both the welded ones (actually ended up welding 2) and the untouched ones.

              Comment


              • #8
                Sounds like it was installed with the weight of the exhaust hanging on the header.
                "I'm sorry, I didn't mean to upset you when I called you stupid. I thought you already knew..."
                spammer police
                USAF veteran
                If your a veteran, join the KR veterans group

                Comment


                • #9
                  I don't think that is the issue, as we lifted the back end up and held that in place with its bolts then put the headers into position.

                  Comment


                  • #10
                    Pretty sure they go in the way you have them installed this is the way I have always done.
                    I don't think you could do it the other way round unless you had 4 hands to hold it all together.

                    Yeah pretty definitely they sit in the clamp and then it is pushed on.

                    The clamp should then press against the exhaust flange.

                    For reference I just measured by exhaust gaskets and they are 5m thick or just under 1/4 inch.
                    Last edited by Lachie; 08-02-2017, 01:06 AM.
                    “Anything that happens, happens. Anything that, in happening, causes something else to happen, causes something else to happen.
                    Anything that, in happening, causes itself to happen again, happens again. It doesn’t necessarily do it in chronological order, though.”
                    ― Douglas Adams

                    Comment


                    • #11
                      Should..... I have placed a floor jack under the collector and raised it slightly.
                      "I'm sorry, I didn't mean to upset you when I called you stupid. I thought you already knew..."
                      spammer police
                      USAF veteran
                      If your a veteran, join the KR veterans group

                      Comment


                      • #12
                        I mean it was easier putting them in the clamp and putting it on, but I have a vague recollection of putting them in around the header (the second option in the picture) and then putting the clamp on when I initially took it off to find the cracked pipe. I remember because it was a pain in the ass and they kept falling off as I tried to tighten it.

                        Comment


                        • #13
                          How does the gasket fit in the head, snug?
                          "I'm sorry, I didn't mean to upset you when I called you stupid. I thought you already knew..."
                          spammer police
                          USAF veteran
                          If your a veteran, join the KR veterans group

                          Comment


                          • #14
                            It fits snug in the head but I am pretty sure they are not being compressed at this point before the clamp runs out of travel against the head. Which is why I initially thought I had been sent gaskets that were too narrow. That, and the parts diagram above led me to believe I had put all the flanges in backwards because the only possible other thing that has changed from before when I had one exhaust leak to now is the gaskets which the supplier insists are the right one for this bike, and they do look the same as the ones taken out. So I guess long story short, I am wondering if anyone knows definitely which way those flanges are supposed to go.

                            Edit: They are the same size as the person above posted, approx. 1/4 inch wide, so I guess that is confirmation that the gaskets are right.
                            Last edited by Dhawk12; 08-02-2017, 01:18 AM. Reason: Update

                            Comment


                            • #15
                              Well the end flange on the header is the seal, the secondary flange is for compression of the header flange so depth is the concern. If the secondary flange isn't stepped or beveled it shouldn't matter. If it's stepped the wide part it on the clamp side as would be the beveled flange. I'll check the manual.
                              "I'm sorry, I didn't mean to upset you when I called you stupid. I thought you already knew..."
                              spammer police
                              USAF veteran
                              If your a veteran, join the KR veterans group

                              Comment

                              Working...
                              X