Ad Widget

Collapse

Announcement

Collapse
No announcement yet.
X

17" wheel conversion I did it!!!

Collapse
  • Filter
  • Time
  • Show
Clear All
new posts

  • 17" wheel conversion I did it!!!

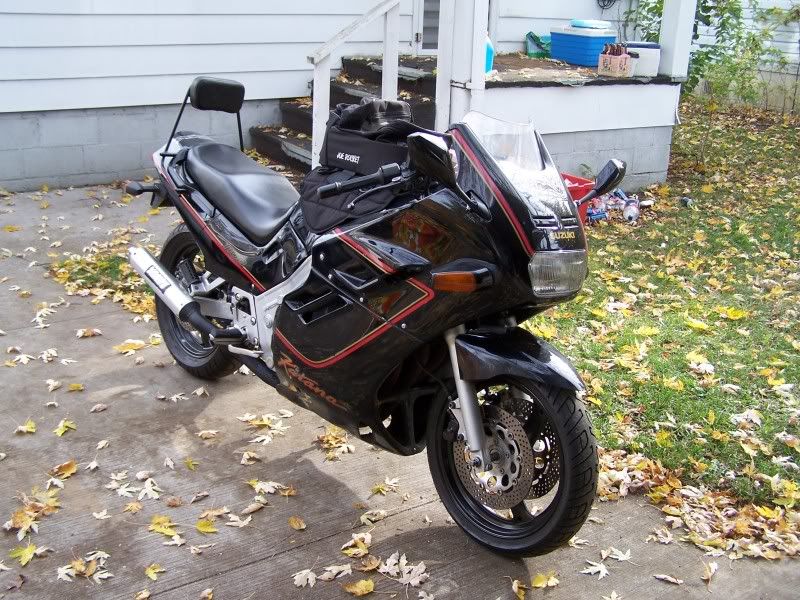
    I have read of a few people converting to 17" wheels here and decided it was time to have a go at it. I had a set of 600 kat wheels of the 90s vintage, with new shinko tires, and was really sick of fighting the bike into the corners. After measuring it all up it was quite simple as the 600 parts are a touch smaller than the 1100 stuff.
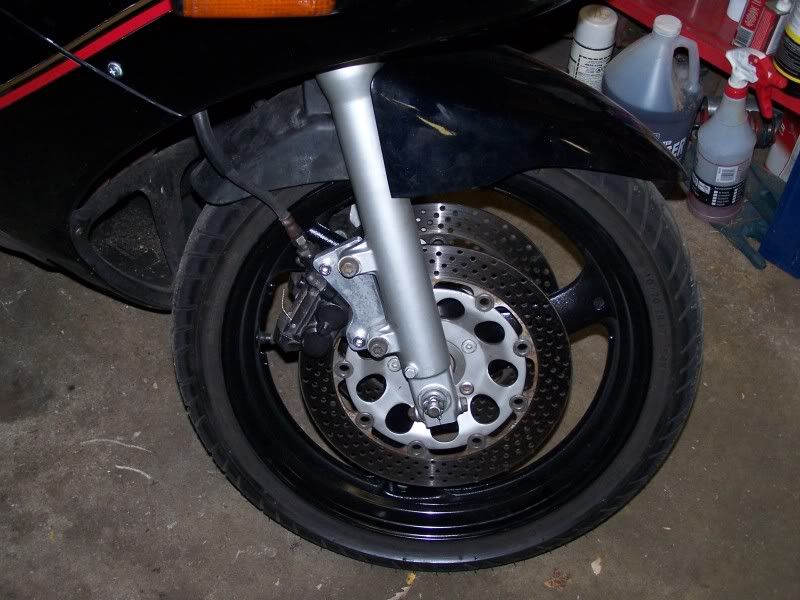
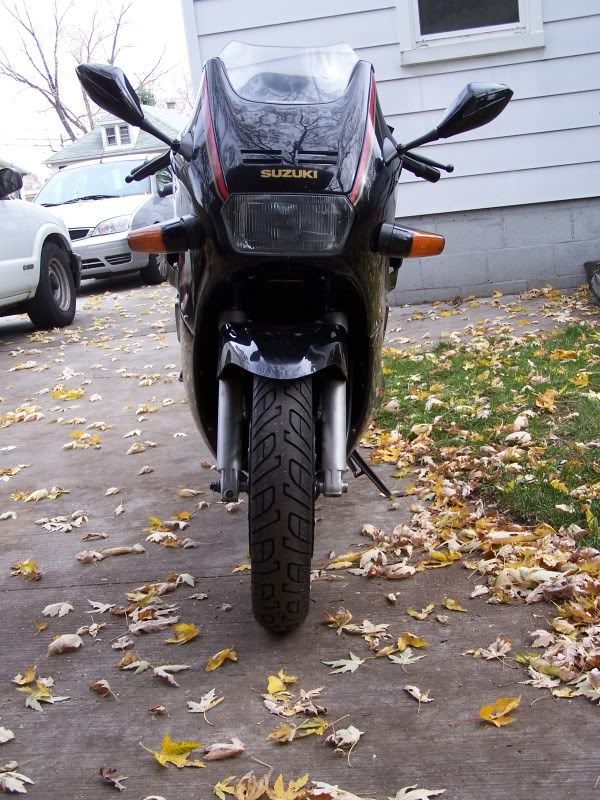
    The 600 front axle is smaller, and the brake offset is narrower; but the 600 speedo drive is the same and the 600 brake calipers are a good match to the 1100 master cylinder. I turned up reducers to fit in the fork legs and made a new axle as the 1100 fork width is wider than the 600. It does appear that one could also swap the bearings in the 600 wheel with the 1100 bearings and use 1100 axle and parts but I did not go that route. I prefer to use the smaller axles. I used the 600 calipers and discs and made adapters from aluminum plate. The offset required is just under .500" so it was a matter of drilling some holes and a couple of spot faces.
    The rear axle is also smaller but the 600 wheel with the stock cush drive spacers sits centered in the swingarm. I used the 1100 brake and axle adjusters, and 600 wheel, rotor, brake arm, axle. I turned up reducers for the axle, and made new spacers for the brake side. I also made a caliper mount from .250" aluminum plate. The 600 brake arm had to be shortened slightly and bent a little more but shares the same bolt sizes as the 1100 and the cush drive had to have the sprocket set back about .100". Again it appears that you could swap the bearings and use the 1100 axle and spacer on the 600 wheel.
    I also went down to a 530 chain with a 16T front and a 47t rear.
    All I can say is WOW what a difference. The bike actually feels like it is geared properly, and it turns in without hesitation. It maintains any corner line and feels planted and nimble. I rode two up all weekend and never wanted to get off of it.
    With the availability of 600 kat wheels at cheap prices and the near bolt in if you swap bearings I don't know why others are not doing this. It by far is worth the effort.

  • #2
    How about some pictures!
    -Steve


    sigpic
    Welcome to KatRiders.com! Click here to register
    Don't forget to check the Wiki! http://katriders.com/wiki

    Comment


    • #3
      yup....photos would have been cool. knowing others wanted to do similar, you should have written up a "how to" with pics. you would have been God if you did.....instead of someone who did it, and vaguely described how.
      I don't have a short temper. I just have a quick reaction to bullshit.


      Comment


      • #4
        Originally posted by steves View Post
        How about some pictures!
        ... it's that whole "worth a 1000 words" thing .... pix please
        The people who think they know everything always mess it up for those of us who do .....


        BIGKAT1100

        Comment


        • #5
          Sorry for the delay but here goes!

          and

          I will try to describe the process. To complete this you will need a lathe, and at least a drill press(a mill is better).

          Comment


          • #6
            try to get a pic from standing back...of the front wheel and fender. I would like to see how the radius of the 1100 fender compares to the tire/rim. sometimes changing wheel/tire sizes throws off the look of the bike. the fender looks "odd".
            I don't have a short temper. I just have a quick reaction to bullshit.


            Comment


            • #7
              I will try to post more pictures as I can so please be patient. For the front wheel swap you will need the following parts:
              90s era Katana 600 - front wheel,brake rotors, axle, speedo drive, brake calipers,and throttle side axle spacer.
              I made my own front axle but it appears a stock katana 600 unit is long enough.
              Remove the 1100 front wheel and brake calipers. Now is a good time to rebuild your forks as well! The 600 axle is smaller than the 1100 so you will need new adapters to sleeve the hole size in the forks.
              Start on the speedo drive side. From 1in. dia. bar stock I turned up a stepped spacer. This spacer has a hole through it to fit the 600 axle. I then turned part of the outside diameter so it will socket into the fork. Leaving a shoulder .302 in. wide at the full 1in. Dia. This spacer sleeves the fork leg down to except the smaller axle and offsets the speedo drive and wheel .302 in. from the inside of the fork leg. You can now test fit the front wheel using the 600 axle, custom speedo side spacer, 600 speedo drive, and 600 throttle side bearing cover/spacer.
              The speedo drive ends are the same so the 1100 cable will plug into the 600 drive. The spacer you just made should only protrude from the inside of the fork; cut it flush with the outside of the axle so the head of the axle fits directly against the fork leg.
              Now turn down a piece of the 1in. bar to fit into the large hole in the other fork leg, drill it out to except the smaller axle. Also cut this spacer to length so it protrudes slightly from the outer side of the fork. This spacer should fit into the fork leg and tighten against the 600 throttle side bearing cover/spacer. Now you can bolt the whole assembly together, tighten things up and check for looseness or other problems. Also measure from the brake rotors to the inside of the fork legs. This measurement should be the same for both sides (within .020 in.). It would be wise to cut the .302in. shoulder long and sneak up on the dimension.

              Comment


              • #8
                Now that the front wheel is installed and centered you can make the brake mounts. The flare fitting on the 600 caliper is the same as the 1100 so you can simply bolt the stock 1100 lines to the 600 calipers. I used hole transfer punches to transfer the hole locations for the caliper brackets, and a couple of small clamps to hold things together. Also bolt the brackets together when drilling the holes; this will make them symmetrical and you will only need to transfer the holes once. Also you can drill/tap the mounting holes for the forks or drill them and use a longer bolt and nut. There is enough room for either method depending on what tools you have.
                Make a cardboard template of the caliper bracket; leaving ample meat around the bolt holes. I used the boss thickness of the mounts as a guide. Caliper placement and angle is not critical. However the offset is, and the location height wise of the pads to the rotor is as well.
                Using a .500 in. thick piece of plate aluminum make the cut away for the outer profile of the caliper. A hacksaw, files, and hole saw will work. Do both at once by clamping them together (you already know that). Now using the transfer punches mark and drill your first hole (through both parts clamped together). Now, bolt the caliper to both brackets (still clamped together), position and mark and drill your second hole. Now trim off any excess material (still clamped together) so the brackets will fit to the fork legs.
                Now each bracket must have two .050 in. deep spot faces in them. This spot face is done where the bracket meets the fork leg mount; or you can mill the whole bracket to a total thickness of .450 in. I marked and spot faced a large area so I had some room to move the bracket around. This could be done on a drill press using a center cutting endmill and a ridged vise setup.
                I then bolted the caliper to the bracket and positioned it on the rotor so the pad was centered and marked my top fork leg hole using a hole transfer punch. Again I bolted the caliper brackets together and drilled one hole through both brackets. I then bolted the caliper to one of the brackets and bolted that through the first fork leg hole. Now check your fit and mark the last hole. Again unbolt everything and bolt the brackets together and drill one hole through both brackets. Now clean up any sharp edges, burrs, or marker and bolt the whole thing together, and bleed the brakes.
                If the calipers are centered properly they will not move side to side when you apply the brakes, also the wheel will spin freely. The brake lever may have more travel than the stock set-up. I personally prefer the greater feel. This set up will lock the front wheel up so it has more than enough breaking capability; assuming you are using good parts.
                Now sit back and admire your workmanship!!!

                My front wheel tire combo have the same circumference as the stock setup. So any difference is an optical illusion. Personally I think the front fender looks great with the new wheels. More importantly the bike handles and stops great. Also the ability to now get something other than cruiser tire compounds can't be over stated! I took the bike through the tunnel of trees here in Michigan and it didn't miss a beat.
                Here are more pics.

                Last edited by jaluesing; 11-03-2010, 12:31 PM. Reason: Automerged Doublepost

                Comment


                • #9
                  Great write up...

                  I like the back rest. Do you have closer pictures and write up so I can copy?

                  Thanks,

                  Comment

                  Working...
                  X