
 Tweet
Tweet
== HID Projector Retrofit ==
There’s a lot of folks slapping so-called “HID conversion kits” into their headlight buckets and running around blinding oncoming traffic with the results. That’s illegal in the US (violates DOT regulations) and generally not a good idea since our lives depend on drivers not hitting us. Some dispute this by stating that they don’t get flashed by oncoming drivers but (I believe) that’s more a matter of drivers getting used to boneheads blinding them with crummy HID conversion bulbs than it is an indication that the bulbs work well. It’s still illegal and it still contributes to the view that motorcyclists are a bunch of jerks.
While I love the idea of better lighting, I don’t like the idea of becoming a hazard to navigation in the process. When I decided to do something to improve my headlight I decided that the best way to do this was to install an entire HID projector system. To keep things looking nice as well as providing some protection to the HID I decided the best place to do this was inside the stock headlight housing. I got quite a bit of inspiration from Uno’s Project "I wear my sunglasses at night" thread although that was done on a dual-headlight post-98 bike and I did it on a single-headlight pre.

== Background Information ==
The problem with blinding oncoming traffic comes from the fact that HID bulbs don’t produce light the same way as standard Halogen bulbs. Halogen bulbs produce light by passing current through a metal filament. In a filament bulb, the filament heats up and glows, emitting light. The Halogen bulb is filled with a gas (Halogen) which glows when heated, adding to the light. It changes the color a bit, too but the majority of the light source is concentrated around that filament. This is essentially a “point source” of light. An HID bulb works by producing a very high voltage arc inside a mass of Xenon gas. The Xenon gas flashes to a plasma state and emits light from the entire mass of gas. Once the Xenon “lights off”, the arc voltage drops to a lower level to maintain the plasma state. Because the majority of the light is being produced by the Xenon plasma, spread evenly through the entire bulb, the HID bulb is considered an “area light source”.
Because of the differences between a point light source and an area light source, the methods of concentrating that light in a useful direction are different. The shaped reflector used for a Halogen bulb just doesn’t work well for an HID. You need a different shape reflector and the HID needs a lens (like a magnifying glass) to work well. Yes, you can throw an HID bulb into your Halogen reflector and get more light output. Add to that the fact that the frequencies of light output from an HID bulb are closer to what your eye is tuned for and you will see an improvement in your ability to see the road ahead at night. Unfortunately, the light won’t all be going where you need it. Instead, you’ll get a lot of light going in useless directions as well in completely inappropriate directions. (Remember that bit about blinding oncoming traffic?)
== Single Projector ==
For starters, anyone wanting to retro-fit an HID projector into a Kat headlight should definitely read Uno's Project "I wear my sunglasses at night" (Bi-xenon projector retrofit) [Pix intensive] thread. That's where I got the idea and that's what got me going on this in the first place. I don't intend to repeat everything he said, just mention anything different, either because I did this on a single-headlight or because I just did it differently.
A couple of years ago I found Uno’s thread and got inspired. I had a bunch of stuff going on at the time but about a year later I started lurking on E-Bay and amassing the parts to do that conversion on my pre-750. About the time I got all the parts together I found a sweet deal on an 1100 Kat so I sidelined the project with plans to sell the 750. That winter I finally got around to starting the conversion, only now on my 1100. It's the same headlight bucket except for the adjustment screws and a couple rubber trim pieces so everything that applies to the 1100 should also apply to the pre-750 and 600.
For the projector, I found a used E46 unit from an Audi TT. It’s a bi-xenon projector, meaning it has a solenoid-activated shutter which rests across the middle of the reflector bowl, behind the lens. When power is sent to the solenoid it activates, rotating the shutter out of the way for the high beam. The bulb was a 35 W, 6,000K D2S unit with no moving parts or fancy bits to break down.
Following Uno's steps, I removed the metal clips holding the lens to the headlight housing (pry from the housing end of the clip to avoid chipping the glass) and then baked the headlight (15 minutes in the oven after pre-heating it to 350 and turning it off). I used a putty knife with rounded corners to pry the lens out of the recess in the housing. The lens came out nicely without all the chipped edges Uno's picture shows.
The cement used to glue the lens to the housing appears to be nothing more than 3M Construction Adhesive. It softens with heat but holds like nobody's business when it cools. If you need to add adhesive or feel the need to clean up the housing before starting work on it, the 3M stuff is available at Lowes or wherever. I left the original adhesive alone. The lens went right back in after I baked everything again and hasn't shown any tendency to come loose.
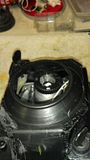
I bolted the headlight (without the lens) into a wooden frame I built for the purpose, laid out tape on the floor, match-marked the frame base so I could place it back exactly as I had it and put some tape on the garage wall to show where the center of the low-beam cutoff hit. Then I loosened up the adjustment screws all the way and popped the reflector off the pivot point. A medium screwdriver works well for that since the pivot point is a ball held in a nylon socket.
I cut out the back of the reflector using a Dremel cut-off wheel and then started refining the cutout using the Dremel again with a 1/8" Roto-zip bit. I wanted the lobes on the sides of the projector to ride on the inside of the reflector with the bulb base and high/low beam solenoid sticking through the back of the reflector below the center. Note: the shutter goes across the bottom of the HID reflector. The projector lens reverses the light pattern so blocking the bottom of the light defines the low-beam cutoff. I continued refining the cutout until the lobes on the projector housing bottomed out without the bulb base or solenoid touching anything.
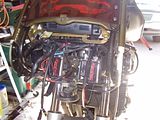
To mount the projector inside the reflector I dropped the four mounting screws through the projector mounting holes and marked where they hit with a Sharpie. I used the Dremel again to drill the holes and then used the Roto-zip bit to elongate them until the screws dropped straight through. I cut some aluminum spacers at about a 45 degree angle and used them on the outside of the reflector as washers to allow the nuts to tighten up on the screws without pulling anything out of line. By allowing the tabs on the sides of the projector to bottom out inside the reflector I was able to play with the four screws until the projector was pretty much pointing straight in line with the center of the reflector. I estimated this by watching how the projector bulb base lined up on the back side of the reflector. Benefits of cutting out as little of the reflector as possible...
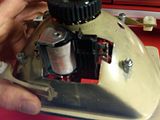
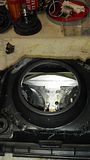
Instead of painting everything black like Uno, I left the reflector alone and wrapped the outside of the projector frame in metal ducting tape, providing a shroud so none of the light (or at least as little of it as possible) was escaping through the sides and being directed out by the reflector. I did have to make allowances for the shutter. It sticks out the sides of the projector's lens frame just a bit. I liked the idea of everything looking as close to stock as possible. At least at a casual glance...
After everything was tightened down with threadlock applied I snapped the reflector back onto the adjustment screws in the housing, mounted it all up in my bracket and installed the bulb. I lined the bracket up with the match-marks on the floor and adjusted the screws until the low-beam cutoff lined up with the tape marks on the wall.
Because I'd mounted the projector so far back in the reflector I discovered that the rod the high-beam solenoid moves would hit the inside of the headlight housing when I turned on the high-beam. I solved this by heating the plastic headlight bucket with a heat gun and adjusting the reflector down, putting pressure on the hot plastic from the inside. This distorted the bucket enough that when I adjusted it back to the marks on the wall the solenoid rod cleared just fine.
To finish the assembly I re-baked the headlight bucket and lens, pressed them back together (with gloved hands) and re-installed the metal clips to keep everything in place until the adhesive cooled back down. I did discover that until I put the clips on, every time I let go the lens would try to push back out of the housing. Put the clips on.
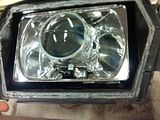
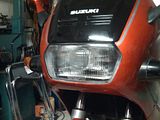
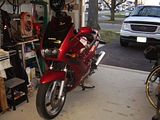
Well, here's the results. If you look closely you can see the projector inside the headlight lens but it isn’t obvious to a casual observer that there’s anything modified about it . I'm pretty happy with the results and there's a lot more light without blinding anyone.
== Dual Projector ==
Since I’m never really satisfied with good, I decided to try for incredible—dual projectors inside a single headlight bucket. Some casual measurements convinced me that I could fit a pair of 2.5” projectors inside the headlight bucket so off I went. When I did the single projector retrofit I bought a two bulb/ballast setup from e-bay since that was only a little more than buying one. At the time I was thinking I’d sell the remaining bulb/ballast but I never got around to posting it for sale so it was still in the garage. Right. So I’m going to use D2S bulbs. A quick trip to ebay produced a pair of 2.5” projectors to fit the bulbs including the lock rings.
Since there was no way I was going to get away with just sticking the back ends of the two projectors through the back of the stock reflector, I decided to use a plate glued and riveted into the front of the reflector. Some careful work with a drafting program produced a pattern for the mounting plate which I printed, and spray-glued onto a piece of aluminum for cutting and drilling.
In order to hold both projectors, the mounting plate had to be wider than the reflector. Just to make them match up I had to trim the side flanges off the front of the reflector. OK. That done, I drilled for rivets at the corners, epoxied the two pieces together and backed it all up with the rivets before leaving it all to set up overnight. The next night I started going nuts with the Dremel, cutting away the reflector bowl to make room for the projectors. Let me tell you, whatever those bowls are made of is some tough stuff. After eating half a dozen supposed heavy duty cut-off wheels I gave up on the Dremel and broke out the air tools. That got things done a lot faster and it wasn’t long before I had cut away just about everything that didn’t connect the new mounting plate to the adjustment screws and pivot point. A quick test fit showed that the left projector fit just fine but there was no way the right-hand projector’s high-low solenoid was going to clear what little remained of the reflector brackets. Now a smart man would have said the heck with it, it’s not going to work and put the projectors up for sale to recoup some of his losses. I’m not that smart. I removed the offending solenoid, leaving the shutter in place and resigned myself to the idea that I’d only have low-beam on the left-hand projector.
Then it was time to check the fit inside the headlight bucket. It took a little bit of grinding at the widest point of the mounting plate to get things to the point where nothing caught but that really wasn’t that big a deal. It worked out fine.
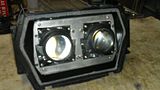
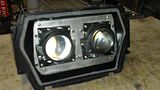
Next snag. While the light assembly would fit, there was no room for the bulb bases. It was that close a fit. Oh boy. Again, a smart man… I broke out a saw and started cutting the back out of the bucket. I added a 1-inch strip cut from an inner fender that nobody’s wanted to buy and voila! One extra-deep headlight bucket. Adding an inch made it possible not only to get the bulbs in there but I can even do it from the stock hole in the back of the light without having to disassemble everything. It’s not easy with big hands but it can be done. This time I decided to paint the mounting plate black and use stainless steel cap screws to attach the projectors. I like the contrast. It was the wife’s idea.
==Electrical ==
Just like the stock setup, I used a 10 Amp fuse but power comes straight from the box using 16 gauge wire and it makes me feel better so... The ballast(s) got zip-tied to the instrument cluster bracket and the ground wire went to a bolt on the side of the windshield bracket. Some of the bolts up there are not good grounds so be sure you use a test light from a hot wire to whatever ground point you want to use before committing. The two wires for the high/low beam solenoid(s) went to the high beam and ground points on the original headlight connector. That way switching the high/low beam switch on the handlebar has exactly the normal effect. All connecters got soldered and shrink-wrapped, especially the female ones for hot wires. I hate crimped connecters because after a little while they start to corrode and the next thing you know you have to chase gremlins, trying to get things working again. Better to just take some time and do it right the first time.
==Electrical for the Dual Beam Install==
When I installed the single projector light I installed a relay-controlled aux fuse box and ran power from there. The Dual-projector upgrade required a second power lead so I took the opportunity to swap out the original wiring with even thicker stuff on the theory that it couldn’t hurt. Now I’ve got 12 ga stranded for the hot wires and a single 10 ga stranded line with pigtails for the ground. Can’t hurt. The ballasts zip-tied to the bracket behind the headlight just fine.
==Results==
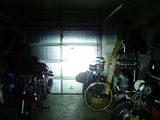
Since I had everything there at the same time, I went ahead and took some comparison photos as well as some lux readings. The lux readings probably aren’t very accurate since I used an Android program called Lux Meter which I downloaded for free on my cellphone. While they probably aren’t accurate, they should at least be uniformly inaccurate and useful as a comparison. I measured about 12 feet forward from the lights and moved the phone around each time to find the highest reading. Since there’s been some discussion about how much you lose from the ridges inside the stock headlight glass, I took some measurements of that, too. There was some loss in intensity but only about 9%. What really surprised me was the lux readings from the single HID setup. It seems to be much brighter than the Halogen but the measurements say otherwise. The Halogen was about 50% brighter. Lesson is, if you’re going to go with a single HID projector then use a 55W bulb/ballast setup.
Halogen (Stock) ----Low 1,650----High 2,320
Single HID------------Low 1,080----High1,860
Dual HID--------------Low 3,500----High 3850
Dual HID without headlight lens----Low 3,850----High 3,850
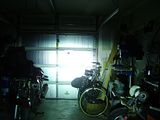
==Photos==
Halogen (Stock)
Single 35W HID
Dual 35W HID
I like the look:
== References ==
NHTSA and DOT references:
Uno’s Project "I wear my sunglasses at night" thread:
There’s a lot of folks slapping so-called “HID conversion kits” into their headlight buckets and running around blinding oncoming traffic with the results. That’s illegal in the US (violates DOT regulations) and generally not a good idea since our lives depend on drivers not hitting us. Some dispute this by stating that they don’t get flashed by oncoming drivers but (I believe) that’s more a matter of drivers getting used to boneheads blinding them with crummy HID conversion bulbs than it is an indication that the bulbs work well. It’s still illegal and it still contributes to the view that motorcyclists are a bunch of jerks.
While I love the idea of better lighting, I don’t like the idea of becoming a hazard to navigation in the process. When I decided to do something to improve my headlight I decided that the best way to do this was to install an entire HID projector system. To keep things looking nice as well as providing some protection to the HID I decided the best place to do this was inside the stock headlight housing. I got quite a bit of inspiration from Uno’s Project "I wear my sunglasses at night" thread although that was done on a dual-headlight post-98 bike and I did it on a single-headlight pre.
== Background Information ==
The problem with blinding oncoming traffic comes from the fact that HID bulbs don’t produce light the same way as standard Halogen bulbs. Halogen bulbs produce light by passing current through a metal filament. In a filament bulb, the filament heats up and glows, emitting light. The Halogen bulb is filled with a gas (Halogen) which glows when heated, adding to the light. It changes the color a bit, too but the majority of the light source is concentrated around that filament. This is essentially a “point source” of light. An HID bulb works by producing a very high voltage arc inside a mass of Xenon gas. The Xenon gas flashes to a plasma state and emits light from the entire mass of gas. Once the Xenon “lights off”, the arc voltage drops to a lower level to maintain the plasma state. Because the majority of the light is being produced by the Xenon plasma, spread evenly through the entire bulb, the HID bulb is considered an “area light source”.
Because of the differences between a point light source and an area light source, the methods of concentrating that light in a useful direction are different. The shaped reflector used for a Halogen bulb just doesn’t work well for an HID. You need a different shape reflector and the HID needs a lens (like a magnifying glass) to work well. Yes, you can throw an HID bulb into your Halogen reflector and get more light output. Add to that the fact that the frequencies of light output from an HID bulb are closer to what your eye is tuned for and you will see an improvement in your ability to see the road ahead at night. Unfortunately, the light won’t all be going where you need it. Instead, you’ll get a lot of light going in useless directions as well in completely inappropriate directions. (Remember that bit about blinding oncoming traffic?)
== Single Projector ==
For starters, anyone wanting to retro-fit an HID projector into a Kat headlight should definitely read Uno's Project "I wear my sunglasses at night" (Bi-xenon projector retrofit) [Pix intensive] thread. That's where I got the idea and that's what got me going on this in the first place. I don't intend to repeat everything he said, just mention anything different, either because I did this on a single-headlight or because I just did it differently.
A couple of years ago I found Uno’s thread and got inspired. I had a bunch of stuff going on at the time but about a year later I started lurking on E-Bay and amassing the parts to do that conversion on my pre-750. About the time I got all the parts together I found a sweet deal on an 1100 Kat so I sidelined the project with plans to sell the 750. That winter I finally got around to starting the conversion, only now on my 1100. It's the same headlight bucket except for the adjustment screws and a couple rubber trim pieces so everything that applies to the 1100 should also apply to the pre-750 and 600.
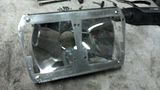
For the projector, I found a used E46 unit from an Audi TT. It’s a bi-xenon projector, meaning it has a solenoid-activated shutter which rests across the middle of the reflector bowl, behind the lens. When power is sent to the solenoid it activates, rotating the shutter out of the way for the high beam. The bulb was a 35 W, 6,000K D2S unit with no moving parts or fancy bits to break down.
Following Uno's steps, I removed the metal clips holding the lens to the headlight housing (pry from the housing end of the clip to avoid chipping the glass) and then baked the headlight (15 minutes in the oven after pre-heating it to 350 and turning it off). I used a putty knife with rounded corners to pry the lens out of the recess in the housing. The lens came out nicely without all the chipped edges Uno's picture shows.
The cement used to glue the lens to the housing appears to be nothing more than 3M Construction Adhesive. It softens with heat but holds like nobody's business when it cools. If you need to add adhesive or feel the need to clean up the housing before starting work on it, the 3M stuff is available at Lowes or wherever. I left the original adhesive alone. The lens went right back in after I baked everything again and hasn't shown any tendency to come loose.
I bolted the headlight (without the lens) into a wooden frame I built for the purpose, laid out tape on the floor, match-marked the frame base so I could place it back exactly as I had it and put some tape on the garage wall to show where the center of the low-beam cutoff hit. Then I loosened up the adjustment screws all the way and popped the reflector off the pivot point. A medium screwdriver works well for that since the pivot point is a ball held in a nylon socket.
I cut out the back of the reflector using a Dremel cut-off wheel and then started refining the cutout using the Dremel again with a 1/8" Roto-zip bit. I wanted the lobes on the sides of the projector to ride on the inside of the reflector with the bulb base and high/low beam solenoid sticking through the back of the reflector below the center. Note: the shutter goes across the bottom of the HID reflector. The projector lens reverses the light pattern so blocking the bottom of the light defines the low-beam cutoff. I continued refining the cutout until the lobes on the projector housing bottomed out without the bulb base or solenoid touching anything.
To mount the projector inside the reflector I dropped the four mounting screws through the projector mounting holes and marked where they hit with a Sharpie. I used the Dremel again to drill the holes and then used the Roto-zip bit to elongate them until the screws dropped straight through. I cut some aluminum spacers at about a 45 degree angle and used them on the outside of the reflector as washers to allow the nuts to tighten up on the screws without pulling anything out of line. By allowing the tabs on the sides of the projector to bottom out inside the reflector I was able to play with the four screws until the projector was pretty much pointing straight in line with the center of the reflector. I estimated this by watching how the projector bulb base lined up on the back side of the reflector. Benefits of cutting out as little of the reflector as possible...

Instead of painting everything black like Uno, I left the reflector alone and wrapped the outside of the projector frame in metal ducting tape, providing a shroud so none of the light (or at least as little of it as possible) was escaping through the sides and being directed out by the reflector. I did have to make allowances for the shutter. It sticks out the sides of the projector's lens frame just a bit. I liked the idea of everything looking as close to stock as possible. At least at a casual glance...

After everything was tightened down with threadlock applied I snapped the reflector back onto the adjustment screws in the housing, mounted it all up in my bracket and installed the bulb. I lined the bracket up with the match-marks on the floor and adjusted the screws until the low-beam cutoff lined up with the tape marks on the wall.
Because I'd mounted the projector so far back in the reflector I discovered that the rod the high-beam solenoid moves would hit the inside of the headlight housing when I turned on the high-beam. I solved this by heating the plastic headlight bucket with a heat gun and adjusting the reflector down, putting pressure on the hot plastic from the inside. This distorted the bucket enough that when I adjusted it back to the marks on the wall the solenoid rod cleared just fine.
To finish the assembly I re-baked the headlight bucket and lens, pressed them back together (with gloved hands) and re-installed the metal clips to keep everything in place until the adhesive cooled back down. I did discover that until I put the clips on, every time I let go the lens would try to push back out of the housing. Put the clips on.
Well, here's the results. If you look closely you can see the projector inside the headlight lens but it isn’t obvious to a casual observer that there’s anything modified about it . I'm pretty happy with the results and there's a lot more light without blinding anyone.


== Dual Projector ==
Since I’m never really satisfied with good, I decided to try for incredible—dual projectors inside a single headlight bucket. Some casual measurements convinced me that I could fit a pair of 2.5” projectors inside the headlight bucket so off I went. When I did the single projector retrofit I bought a two bulb/ballast setup from e-bay since that was only a little more than buying one. At the time I was thinking I’d sell the remaining bulb/ballast but I never got around to posting it for sale so it was still in the garage. Right. So I’m going to use D2S bulbs. A quick trip to ebay produced a pair of 2.5” projectors to fit the bulbs including the lock rings.
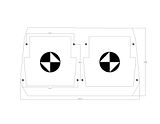
Since there was no way I was going to get away with just sticking the back ends of the two projectors through the back of the stock reflector, I decided to use a plate glued and riveted into the front of the reflector. Some careful work with a drafting program produced a pattern for the mounting plate which I printed, and spray-glued onto a piece of aluminum for cutting and drilling.


In order to hold both projectors, the mounting plate had to be wider than the reflector. Just to make them match up I had to trim the side flanges off the front of the reflector. OK. That done, I drilled for rivets at the corners, epoxied the two pieces together and backed it all up with the rivets before leaving it all to set up overnight. The next night I started going nuts with the Dremel, cutting away the reflector bowl to make room for the projectors. Let me tell you, whatever those bowls are made of is some tough stuff. After eating half a dozen supposed heavy duty cut-off wheels I gave up on the Dremel and broke out the air tools. That got things done a lot faster and it wasn’t long before I had cut away just about everything that didn’t connect the new mounting plate to the adjustment screws and pivot point. A quick test fit showed that the left projector fit just fine but there was no way the right-hand projector’s high-low solenoid was going to clear what little remained of the reflector brackets. Now a smart man would have said the heck with it, it’s not going to work and put the projectors up for sale to recoup some of his losses. I’m not that smart. I removed the offending solenoid, leaving the shutter in place and resigned myself to the idea that I’d only have low-beam on the left-hand projector.
Then it was time to check the fit inside the headlight bucket. It took a little bit of grinding at the widest point of the mounting plate to get things to the point where nothing caught but that really wasn’t that big a deal. It worked out fine.


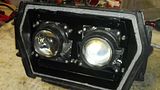
Next snag. While the light assembly would fit, there was no room for the bulb bases. It was that close a fit. Oh boy. Again, a smart man… I broke out a saw and started cutting the back out of the bucket. I added a 1-inch strip cut from an inner fender that nobody’s wanted to buy and voila! One extra-deep headlight bucket. Adding an inch made it possible not only to get the bulbs in there but I can even do it from the stock hole in the back of the light without having to disassemble everything. It’s not easy with big hands but it can be done. This time I decided to paint the mounting plate black and use stainless steel cap screws to attach the projectors. I like the contrast. It was the wife’s idea.


==Electrical ==
Just like the stock setup, I used a 10 Amp fuse but power comes straight from the box using 16 gauge wire and it makes me feel better so... The ballast(s) got zip-tied to the instrument cluster bracket and the ground wire went to a bolt on the side of the windshield bracket. Some of the bolts up there are not good grounds so be sure you use a test light from a hot wire to whatever ground point you want to use before committing. The two wires for the high/low beam solenoid(s) went to the high beam and ground points on the original headlight connector. That way switching the high/low beam switch on the handlebar has exactly the normal effect. All connecters got soldered and shrink-wrapped, especially the female ones for hot wires. I hate crimped connecters because after a little while they start to corrode and the next thing you know you have to chase gremlins, trying to get things working again. Better to just take some time and do it right the first time.
==Electrical for the Dual Beam Install==
When I installed the single projector light I installed a relay-controlled aux fuse box and ran power from there. The Dual-projector upgrade required a second power lead so I took the opportunity to swap out the original wiring with even thicker stuff on the theory that it couldn’t hurt. Now I’ve got 12 ga stranded for the hot wires and a single 10 ga stranded line with pigtails for the ground. Can’t hurt. The ballasts zip-tied to the bracket behind the headlight just fine.

==Results==
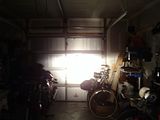
Since I had everything there at the same time, I went ahead and took some comparison photos as well as some lux readings. The lux readings probably aren’t very accurate since I used an Android program called Lux Meter which I downloaded for free on my cellphone. While they probably aren’t accurate, they should at least be uniformly inaccurate and useful as a comparison. I measured about 12 feet forward from the lights and moved the phone around each time to find the highest reading. Since there’s been some discussion about how much you lose from the ridges inside the stock headlight glass, I took some measurements of that, too. There was some loss in intensity but only about 9%. What really surprised me was the lux readings from the single HID setup. It seems to be much brighter than the Halogen but the measurements say otherwise. The Halogen was about 50% brighter. Lesson is, if you’re going to go with a single HID projector then use a 55W bulb/ballast setup.
Halogen (Stock) ----Low 1,650----High 2,320
Single HID------------Low 1,080----High1,860
Dual HID--------------Low 3,500----High 3850
Dual HID without headlight lens----Low 3,850----High 3,850
==Photos==
Halogen (Stock)


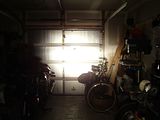
Single 35W HID
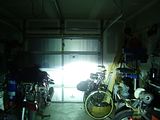
Dual 35W HID


I like the look:

== References ==
NHTSA and DOT references:
Uno’s Project "I wear my sunglasses at night" thread:


Comment