Ad Widget

Collapse

Announcement

Collapse
No announcement yet.
X

'88 Katana & CBR Seat unit

Collapse
  • Filter
  • Time
  • Show
Clear All
new posts

  • '88 Katana & CBR Seat unit

    Hi guys,
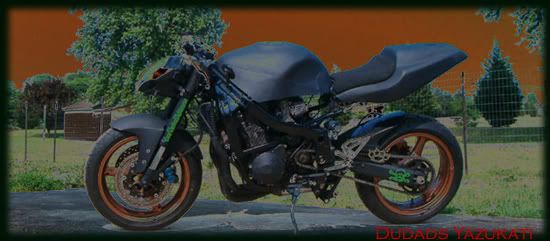
    Looking for opinions and advice. In the photos you can see the seat unit I've decided to fit, Its off a CBR but goes on quite well. I've already moved the battery to where the airbox used to be to tidy up the underseat area but I have no idea over what to do with the area where the tank, seat and fairing meet.

    I could just leave it and tidy up the wiring. Personally its the top of the fairing, with it being so square, that I think is wrong and I don't really want to grow the seat to match with the fairing but I could grow the fairing to match the seat. Maybe put some wire mesh there? Anyway take a look and give me any thoughts you have.

    cheers,
    Mark
    Attached Files

  • #2
    if you know how to fiberglass maybe you could cut it to fit the hole and attach it to the red fairing then you could coat it in fiberglass and paint it. but im not expert i dont think just wire mesh there would look good IMPO
    i does look sweet with that tail

    Comment


    • #3
      Originally posted by katclaw
      if you know how to fiberglass maybe you could cut it to fit the hole and attach it to the red fairing then you could coat it in fiberglass and paint it. but im not expert i dont think just wire mesh there would look good IMPO
      i does look sweet with that tail
      Sorry mate not sure what you mean by cut it? Cut what? I can do any type of bodywork, it was my job for about 10 years, I just don't have any imagination

      Having another play last night I thought of fitting small intake cowls to feed the pod filters? Not the best picture but the only thing I had to hand was a plastic milk bottle
      Attached Files

      Comment


      • #4
        oh sorry about that i meant cut some wire mesh to fit the holes then cover them with fiber glass. i kinda like the intake idea just make sure your legs not going to hit it and it might look a little better lower.

        Comment


        • #5
          Originally posted by katclaw
          i kinda like the intake idea just make sure your legs not going to hit it and it might look a little better lower.
          Cheers, guess I need to find the pegs to see where my leg goes

          Comment


          • #6
            is that a Suzonda, or a Honuki?
            I don't have a short temper. I just have a quick reaction to bullshit.


            Comment


            • #7
              i agree it is sweet but ...

              you should scratch the word ...honda...

              It seems that you need some body work creating an extension from the lower back fearing to the front.

              Comment


              • #8
                Originally posted by Mojoe
                is that a Suzonda, or a Honuki?


                i just wanted to check in on your project to see what you ended up doing or if you got it finished

                Comment


                • #9
                  Sorry guys for delay, I got sent to Germany for a couple of weeks.

                  Sorry no photos at the moment but I'll get some ASAP.

                  So the status, Seat sub frame is built and installed. I didn't want to hack the frame too much so I built it to sit between the rear tank brace and the first seat brace. This means I can go back to original if I want to but I have pretty much already decided to fit a CBR subframe next winter. This would mean that I can remove all of the original rear frame and fit the FZR rearsets that I have lying around. I tried fitting them earlier but the bottom part of the rear frame just gets in the way.

                  All the stickers are removed Need to consider the new colour, quite like orange The tank in the pictures is the badly dented original, I do have a red (burgundy?) spare that will be fitted. Probably paint all the plastics white for the summer.

                  At the moment I'm about to start remodelling the seat. I wanted to see how it looks If I take the seat pad up and around the tank, just like the original. if its doesnt look right then I guess I will just use some body filler on the tank to tidy it up.

                  While I had a few minutes spare I fitted some Hi-brite RGB leds in the clocks. Probably a bit too much for some but hey. They are on a slow cycle, changing colour every 3-5 seconds, I like them and they only cost about £2.00 ($4) for 10 with resistors.

                  Comment


                  • #10
                    If you try to bondo that indent it is going to crack very quickly
                    Uh Oh here we go....

                    Comment


                    • #11
                      Originally posted by BlackKatnWV
                      If you try to bondo that indent it is going to crack very quickly
                      ?Why?

                      What you suggesting?

                      Comment


                      • #12
                        You'd better solder or weld a thin layer off sheetmaterial to get rid off those indents, bondo will peal off eventually.
                        If I remember correctly Waltari did bondo those indents and it did come off.

                        Comment


                        • #13
                          Yeah Waltari tried and failed with Bondo..
                          marki, I think you found a very good seat unit to start with. I think it flows really well and the size looks right.
                          Were you in Dresden??

                          Comment


                          • #14
                            Originally posted by Black_peter
                            Yeah Waltari tried and failed with Bondo..
                            marki, I think you found a very good seat unit to start with. I think it flows really well and the size looks right.
                            Were you in Dresden??
                            Actually I made a fiberglass patch for each side and glassed them in place. The first few weeks they looked great but after a while, sitting in the sun cause the metal to start expanding and cause one edge on each side lift/crack

                            I wound up removing the fiberglass patches completely, forming a steel patch for each side and welding them in place (like I should have done in the first place if I wasn't being lazy.

                            Now before you run out and start welding on your gas tank remember. THERER IS GAS IN THERE AND IT WILL EXPLODE. Proper methods must be taken to empty the tank for liquids and vapors. If you don't already know how to do it, tank to a local tank repair shop for autos and see how the do it.

                            It tooks me 3-4hrs to empty and prep the tank before I ever started cutting/welding on it.

                            Comment


                            • #15
                              Originally posted by Black_peter
                              Were you in Dresden??
                              Of all the places in Germany to choose from I'm amazed you chose Dresden. I spend quite a bit of time there.

                              Comment

                              Working...
                              X