
 Tweet
Tweet
The new tail is coming along pretty well now. I didn't want to post anything about it until I knew it was going to work out. The ultimate idea is to make a cafe-ish tail that still fits with the lines of the bike, and retains at least some passenger seating.
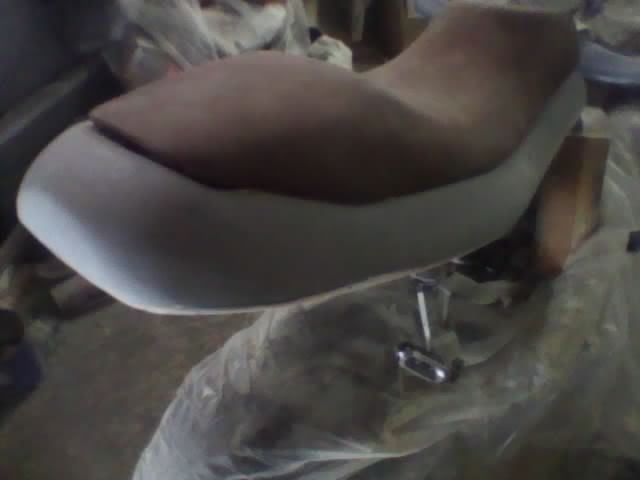
I hacked the seat up to make it shorter in the passenger section, then carved out a bunch of foam from the underside, and wrapped it first in thin (1/2") foam, and then finally in saddle-brown vinyl.
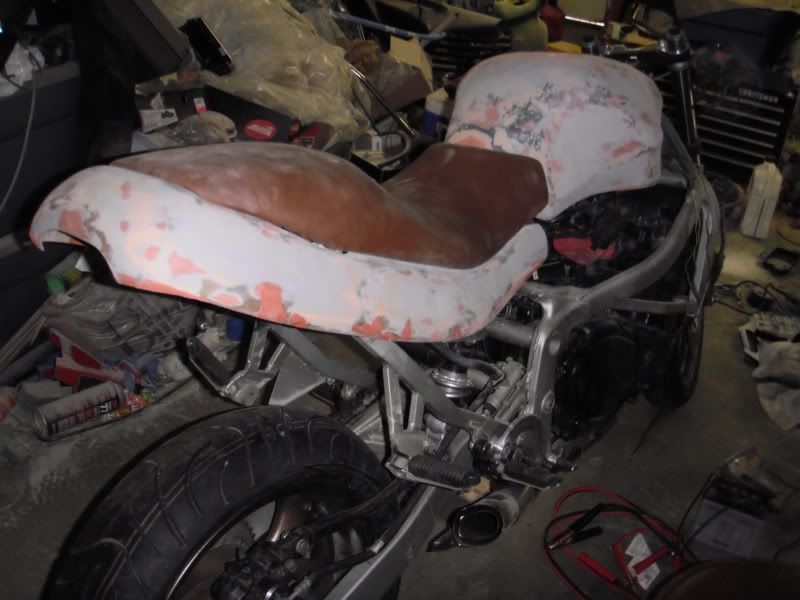
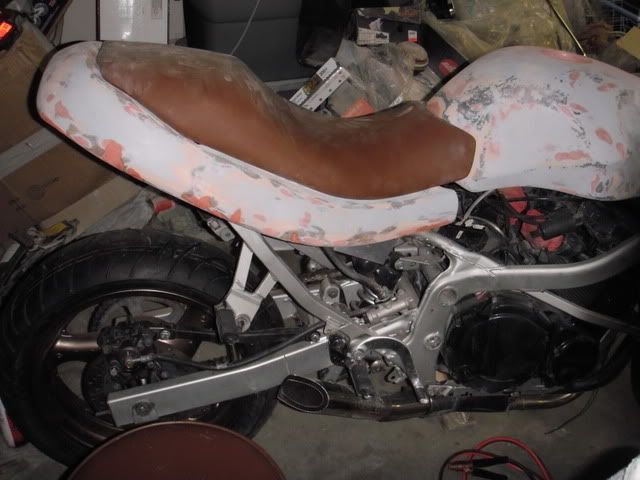
For the tail section, I cut the factory pieces to use them as a form, going back as far as the first seat latch (roughly). From there back I used green flower-arrangement foam from a craft store to make a good form for the rest of the tail. I formed it by bolting pieces of wood to the frame, then contact cementing the foam to the wood until I had a continuous block of foam to carve at. Using a razor knife I carved it into a general shape, and then used a sanding block with 60 grit paper to form it into the final shape.
Once the whole thing was in shape, I used duct tape to make sure that nothing would move while molding it, and to smooth the transition from the foam to the OEM plastic. Once the strategically placed pieces of duct tape were on, I sprayed the foam and plastic with 3m spray adhesive, and covered them with plastic wrap (like, from the kitchen), overlapping each piece by about 3 inches, and trying to keep it as smooth as I could. I then covered the whole surface of the plastic wrap with car wax to use as a mold release.
Then came the fiberglass. My favorite method for glassing something this big (and something cosmetic) is to cut a few layers of chopped mat about 3-4" larger than needed, and let them soak in resin on a table covered in a plastic dropcloth. After a few minutes, the mat will get really workable, and you should be able to lay down all 3 layers, in one piece, at one time. UNFORTUNATELY I don't have the space for that kind of operation (my whole working area is about 4'x8') so I did the whole thing in strips, which is much more time consuming, less aesthetically pleasing, and much harder to keep air bubbles out of.
After the glass was all laid down and cured, I gave it a quick once-over with some 80 grit on a drill-mounted sanding disc, and then absolutely covered the thing in body filler (I used Dynalite Gold this time, but it's not what I prefer). I sanded the body filler down with a half-sheet sander, and then pulled the whole assembly off of the bike so I could dremel it down to its correct shape. After some more body filler, sanding, and a couple of coats of primer it looked like this............ (it's absolutely COVERED in dust in this blurry cell-phone picture, but you get the idea)
Since then I have dremeled out the hole for the tail light (I'm using a Hayabusa unit), and I'm starting to make up the mounting brackets for the fairing itself and the tail light. It's nowhere near ready for paint (remember those air bubbles I mentioned?... yeah ), so I'll be battling the thing with spot putty for at least a couple of days, but at least the basic shape is done.
BTW- If you're considering doing something like this, I want to mention that what I did is form something ON TOP of the shape I made. To do this, you have to remember to leave yourself an extra 4-5mm gap between pieces (in this case, the seat and the plastics) to account for the thickness of the new piece. To make a piece exactly the same as your form, you have to make a mold of it this way, and then make your final piece formed by the mold you just made (I hope my wording makes sense there).
I hacked the seat up to make it shorter in the passenger section, then carved out a bunch of foam from the underside, and wrapped it first in thin (1/2") foam, and then finally in saddle-brown vinyl.
For the tail section, I cut the factory pieces to use them as a form, going back as far as the first seat latch (roughly). From there back I used green flower-arrangement foam from a craft store to make a good form for the rest of the tail. I formed it by bolting pieces of wood to the frame, then contact cementing the foam to the wood until I had a continuous block of foam to carve at. Using a razor knife I carved it into a general shape, and then used a sanding block with 60 grit paper to form it into the final shape.
Once the whole thing was in shape, I used duct tape to make sure that nothing would move while molding it, and to smooth the transition from the foam to the OEM plastic. Once the strategically placed pieces of duct tape were on, I sprayed the foam and plastic with 3m spray adhesive, and covered them with plastic wrap (like, from the kitchen), overlapping each piece by about 3 inches, and trying to keep it as smooth as I could. I then covered the whole surface of the plastic wrap with car wax to use as a mold release.
Then came the fiberglass. My favorite method for glassing something this big (and something cosmetic) is to cut a few layers of chopped mat about 3-4" larger than needed, and let them soak in resin on a table covered in a plastic dropcloth. After a few minutes, the mat will get really workable, and you should be able to lay down all 3 layers, in one piece, at one time. UNFORTUNATELY I don't have the space for that kind of operation (my whole working area is about 4'x8') so I did the whole thing in strips, which is much more time consuming, less aesthetically pleasing, and much harder to keep air bubbles out of.
After the glass was all laid down and cured, I gave it a quick once-over with some 80 grit on a drill-mounted sanding disc, and then absolutely covered the thing in body filler (I used Dynalite Gold this time, but it's not what I prefer). I sanded the body filler down with a half-sheet sander, and then pulled the whole assembly off of the bike so I could dremel it down to its correct shape. After some more body filler, sanding, and a couple of coats of primer it looked like this............ (it's absolutely COVERED in dust in this blurry cell-phone picture, but you get the idea)
Since then I have dremeled out the hole for the tail light (I'm using a Hayabusa unit), and I'm starting to make up the mounting brackets for the fairing itself and the tail light. It's nowhere near ready for paint (remember those air bubbles I mentioned?... yeah
), so I'll be battling the thing with spot putty for at least a couple of days, but at least the basic shape is done. BTW- If you're considering doing something like this, I want to mention that what I did is form something ON TOP of the shape I made. To do this, you have to remember to leave yourself an extra 4-5mm gap between pieces (in this case, the seat and the plastics) to account for the thickness of the new piece. To make a piece exactly the same as your form, you have to make a mold of it this way, and then make your final piece formed by the mold you just made (I hope my wording makes sense there).


Comment