Ad Widget

Collapse

Announcement

Collapse
No announcement yet.
X

Homemade Manometer Notes

Collapse
  • Filter
  • Time
  • Show
Clear All
new posts

  • Homemade Manometer Notes

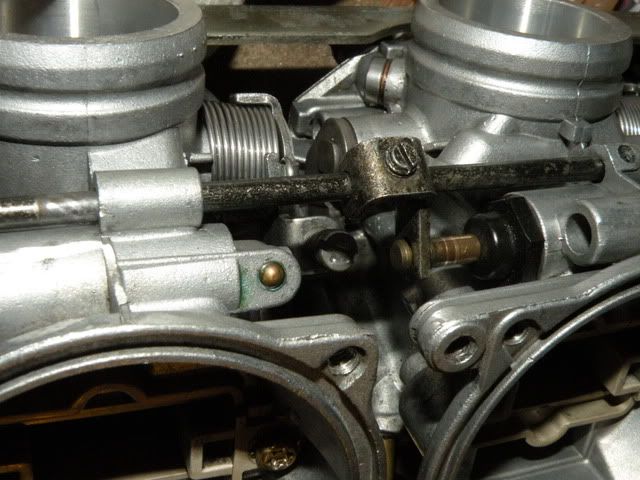
    Today I attempted to make a manometer for synchronizing my carbs. I followed the idea described here: http://faq.ninja250.org/wiki/How_do_...-bottle_method

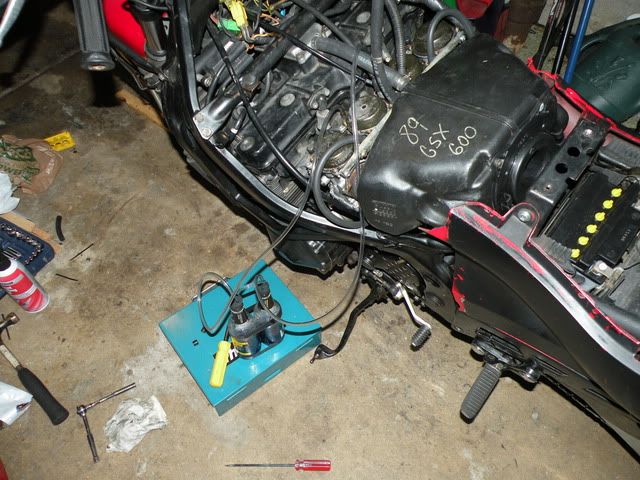
    Here's a bill of parts for my homemade manometer:
    • Two glass bottles (check your recycling bin) -- free
    • Two rubber stoppers. Home Depot 1" x 25/32" Rubber Stopper $1.16 ea (these fit soda bottles but are too big for beer bottles... get a size or two smaller)
    • 10'-20' vinyl tubing. Home Depot 1/4" x 0.170" x 20' Clear Vinyl Tubing $2.98

    Subtotal:
    2*1.16+2.98=$5.30+tax

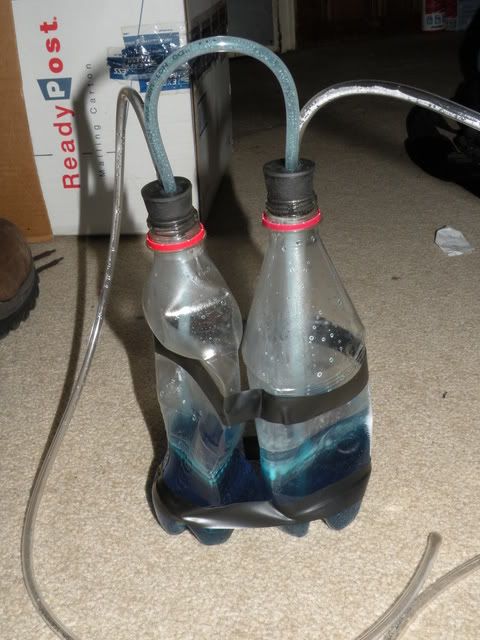
    Tip: don't use plastic bottles!
    Or you'll get this when you start up the engine:

    Instant squash! It squished enough that some drops of water got into the lines to the bike, which freaked me out bigtime!! BTW that's water and food coloring.

    Tip: you might not want to use 10W40 oil with 1/4"x0.170" (OD/ID respectively) tubing.
    It doesn't seem to flow very well. Then again, seeing how much vacuum there actually is, maybe it would be fine. It just took a LOT of effort sucking on the hose to get the oil from one bottle to the other and gravity wasn't doing much to equalize the two.

    Tip: put the stoppers in the freezer for an hour while your cordless drill battery charges; makes it a bit easier to drill the holes

    Tip: I tried using a smaller size bit and working up to the 1/4" for the hole, and then I tried just using the 1/4" right away... either way produced similar results.

    Tip: Dip the end of the vinyl tubing into some oil before stuffing it into the stopper; makes it go in much easier

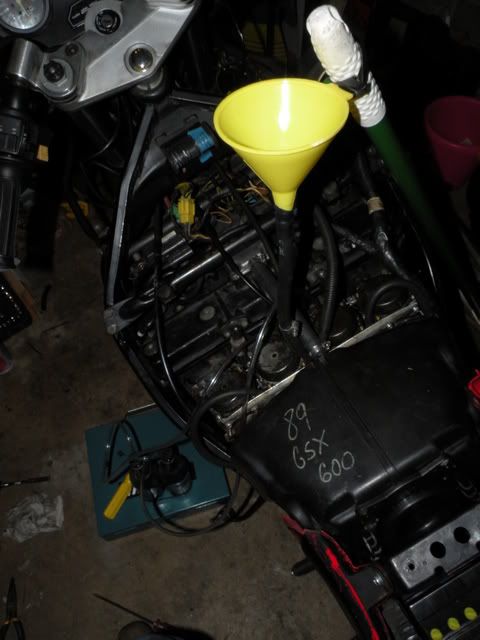
    Tip: Cut the lengths of tubing which go up to the carbs to be longer than 3'. 3' only barely gets from the ground to the carbs... it IS long enough, but only barely. Give yourself the extra length. 10' of tubing from Home Depot should be enough, but it only costs a few cents more (why IDK) for 20', so it can't hurt to get 20'.

    Tip: Home Depot employees have no clue where their rubber stoppers are located... go to the Hardware section... the aisle with the nuts and bolts. Look for the drawers with small specialty hardware like hitch pins and lock washers... they're in there (bottom right drawer at my Home Depot).

    I didn't have any glass bottles so I'm busy dealing with the contents of some Mike's Hard lemonade bottles right now for the cause. Will report in tomorrow if it works. Ordinarily I'd be enjoying beer, but these bottles are clear, and you need to be able to see the liquid in your manometer! Orangina would probably work too.
    EDIT: UPDATE: The Mike's bottles worked great; see my update post below (about 4 down).

    I checked the stoppers with one of the empties and the opening on the Mike's bottle is smaller than a plastic soda bottle... the 1" stoppers are too big, but I can probably stuff them in if I try hard enough. I would get smaller ones if you decide to use beer bottles. However, the smaller the stopper, the harder it is to drill the holes in them for the tubing, so keep that in mind!
    EDIT: UPDATE: The stoppers worked fine in the Mike's bottles. A bit hard to squish in at first, but they were very snug. Could still probably get a smaller size though.
    Last edited by foxox; 03-11-2011, 08:05 PM. Reason: updates

  • #2
    I just used the vinyl tube with a bit of ATF in it taped to a piece of wood....

    Comment


    • #3
      The reason for the bottles is that no liquid can get sucked into the engine. Just a piece of tube will def. work, but I'm a bit paranoid :P

      BTW what does ATF stand for?

      Comment


      • #4
        I'm guessing Automatic Transmission Fluid.
        -Steve


        sigpic
        Welcome to KatRiders.com! Click here to register
        Don't forget to check the Wiki! http://katriders.com/wiki

        Comment


        • #5
          Originally posted by foxox View Post
          The reason for the bottles is that no liquid can get sucked into the engine. Just a piece of tube will def. work, but I'm a bit paranoid :P

          BTW what does ATF stand for?
          Water, ATF, motor oil? you use these so nothing happens when it gets sucked in. Sure you might bog the engine down but no real harm.
          Mercury in the engine is a different story..

          [ame="http://www.youtube.com/watch?v=Z7Ilxsu-JlY"]YouTube - Mercury attacks Aluminum[/ame]

          Comment


          • #6


            The Mike's bottles and 1" stoppers worked out... just took some elbow grease and twisting to get them in, but once they were in they seemed very snug.

            The manometer worked great! Carbs are synchronized (or at least I think so). I took a ride to warm up the bike and by the time I finished the synchronization, it was time for some dinner and now it's dark out so I'll wait for tomorrow to see how it runs.
            EDIT: UPDATE. Runs great! MUCH smoother. It was like rrrRRRRrrrrrrrrrrRRRRrrrRRRRRrrrrrr, now it's like rrrrrrrrrrrrrrrrrrrrrrrrrrrrrrrrrrrrrrrr. Less mechanical noise too!

            Even after doing the bench sync, each pair of carbs was surprisingly unbalanced and the water started flowing quickly from one bottle to the other. I twisted the screws either way until I got that under control. A couple of times, I couldn't find the sync setting quick enough and all of the liquid from one side got sucked to the other. That isn't a problem as long as there isn't so much fluid in there that it can be sucked up by the lines going to the carbs. To get the fluid to siphon back over, you have to over-adjust the screw (for the same reason the fluid won't flow from one bottle to the other when it is disconnected from the bike), then move it back toward the correct setting when the levels are about equal.

            An 8mm deep well socket works great for the lock nut on the 2-3 sync screw. The screw wasn't turning when I rotated the lock nut clockwise, but when I turned it counterclockwise (to loosen it), the sync screw would turn with it. So watch out for that if you find your sync setting, then put on your socket/wrench and try to "ratchet" it back so you can then tighten it ... if it isn't on there tight enough already for the ratchet mechanism to click, then you might be changing your setting. I would try to tighten the lock nut only a small bit at a time to make sure the screw isn't turning.

            Last edited by foxox; 03-13-2011, 10:31 AM. Reason: update

            Comment


            • #7
              yup atf... was what I had laying around... and being red is easy to see...

              Comment


              • #8
                Huh, nut?
                I didn't know they had nuts..
                Motion pro has a tool for that. It's a long tube with an 8mm socket and the screw driver goes inside. Mine has springs, no nuts.. no nuts.
                ..

                Comment


                • #9
                  Originally posted by Black_peter View Post
                  Huh, nut?
                  I didn't know they had nuts..
                  Motion pro has a tool for that. It's a long tube with an 8mm socket and the screw driver goes inside. Mine has springs, no nuts.. no nuts.
                  ..
                  These are 1989 carbs so the nut may not be typical :P The nut is only on the center one, and the outer two have springs.

                  And yeah that tool would be perfect for this job! I tried putting a screwdriver through my deep well socket, and it sort of worked but I didn't have a good way to grip the socket to tighten it. Was going to try vice-grips but didn't want to leave bite marks on my nice socket :P

                  Comment


                  • #10
                    88-89 have a lock nut on the synch screws. Other years are just spring loaded screws.
                    -Steve


                    sigpic
                    Welcome to KatRiders.com! Click here to register
                    Don't forget to check the Wiki! http://katriders.com/wiki

                    Comment


                    • #11
                      Thanks for the tips. I'm planning to do this on my 88 this week, and it has the same carbs as your 89. If you have any other pictures showing where and what to adjust on the carbs, would you post those? Thanks!
                      1988 Katana 600 / GSX600F

                      Comment


                      • #12
                        Sure thing!

                        You'll want to do 2 carbs at a time. 3/4 first, then 1/2, then 2/3.
                        Remember that the engine should be warmed up when you do it.

                        Rigging a temporary fuel tank of some sort (I used a funnel on the end of the fuel line) helps the first time (first time will take a little longer than in the future... in the future, I hear that the gas in the carb bowls should give enough run-time to do it).


                        So for example if you are doing 3 & 4:
                        1. Remove the vacuum cap from the top of the carb->engine boot for both carbs.
                        2. Connect the synchronization tool hoses to these vacuum ports (with the size of hose I got, I had to stretch it a bit to get them to fit on).
                        3. Start the engine only after both hoses are connected.
                        4. Get a screwdriver ready.
                        5. Observe which side of the water gets higher than the other... it'll get more and more uneven if they're off, and they'll stay about the same level if it's even.
                        6. Turn the screw between the two carbs either direction a bit (0.5 to 2 turns initially, especially if they're like wayyy off) until you see the level stop changing, then fine tune it until the water levels equalize. At the end, it'll be a matter of making about 1/8 to 1/16 turn adjustments. (the one in shadow under the choke bar, not the one connected to the choke bar)

                          (I am cleaning my carbs again which is why they are all disassembled :P)


                        The screw between 2/3 on the old 88/89 carbs has a lock nut on it which you have to loosen up before it can be turned.

                        Comment


                        • #13
                          I am new to messing with carbs.

                          First question. Is the process the same for post 98 kats?

                          Second question. My bike runs pretty well, but lately I have been noticing that it idles a little funny. It is kinda like you were saying earlier, rrrrRRRrrrrRRRrrr. Does that mean I should try synchronizing the carbs? I had it checked out at 25 K by the dealership. It is at 30K now. I don't have any noise from the valves or anything like that. It still starts on the first crank or second if it is really cold.

                          Are there any tips for how to turn the screws without actually buying the expensive tool? I will only be doing this to my bike and a special tool seems unnecessary.

                          Comment


                          • #14
                            AWESOME! Thanks a lot! I feel a lot more confident about syncing my carbs now.

                            Originally posted by foxox View Post
                            Sure thing!

                            You'll want to do 2 carbs at a time. 3/4 first, then 1/2, then 2/3.
                            Remember that the engine should be warmed up when you do it.

                            <snip>
                            1988 Katana 600 / GSX600F

                            Comment


                            • #15
                              Added note for anyone doing this...

                              Get a box fan blowing on the front of the bike over the oil cooler while doing this. It will help keep the bike from overheating while you fine tune the sync.

                              1990 and newer 600s, and all 750s do not need a special tool. The sync screws can be turned easily with a regular philips screwdriver (it's actually a JIS, but the philips will work in this case fine). A longer shaft will make it easier if you have one.

                              Krey
                              93 750 Kat


                              Modified Swingarm, 5.5 GSXR Rear with 180/55 and 520 Chain, 750 to 600 Tail conversion, more to come. Long Term Project build thread http://katriders.com/vb/showthread.php?t=96736

                              "I've done this a thousand times before. What could possibly go wron.... Ooops!"

                              Comment

                              Working...
                              X